Adyen Payment Setup [Legacy]
WarningThis is a legacy Adyen setup tutorial. For new integrations, please see the new Adyen Payment Setup tutorial.
For legacy integrations, please see the migration guide.
3D Secure NotePlease note that Cleeng's LEGACY Adyen integration (using Mediastore SDK) does NOT support customers making payments with 3D secure.
Migration from originKey to clientKey
Please perform this step if you already have an existing integration with MediaStore SDK.
With MediaStore SDK 2.0 we migrate from Adyen origin key to clientKey. Your originKey will still work, but we recommend moving to the clientKey.
This change requires upgrading Adyen script to v3.10 - v3.12.1 and passingclientKey instead of originKey.
You can find more details in Adyen docs.
Please check the recipe below for the details of migration:
Purchase using Adyen
Recurring Payment SettingsWe believe that by now you have configured the webhooks and dunning action settings for the recurring to work. If you have not performed those actions, please refer back to Webhooks and Dunnning Actions Settings or contact our BSS team.
Purchase using Adyen involves:
- Adding your domain to allowed origins
- Setting up Adyen Component
- Setting up the Payments
Add your Domain to Allowed Origins
To be able to process the payment via the Adyen connector you need to add your domain to allowed origins.
If Cleeng will be a merchant of records for your solution and all the necessary configuration has been done including webhooks and dunning actions, the next step is to send an email to the BSS team.
In the email:
- add a list of your origins, where you want to use an Adyen component
- provide information about what environment they should be added to: test, production or both
- provide a domain name with http:// or https:// (depending which one is going to be used).
When your origins are added, you will be able to generate an Adyen Component.
If you run the MediaStore app with default settings, it will be open on http://localhost:3003. This origin is already added to the allowed list, so you can start implementing the Adyen Component. Remember that if you publish your page on another domain, your Adyen Component will work only if you have added this origin to the allowed list.
Set up Adyen Component
To enable purchase with Adyen you need to set up an external Adyen component, which will provide secure data encoding.
To set up an Adyen component you can use [Adyen] Create Component recipe OR follow the steps presented below it.
Follow these steps to set up an Adyen component:
- Include the following script in the
<body>above any other JavaScript in your checkout page:
<script src="https://checkoutshopper-test.adyen.com/checkoutshopper/sdk/3.10.1/adyen.js"></script>- Add the CSS file:
<link rel="stylesheet" href="https://checkoutshopper-test.adyen.com/checkoutshopper/sdk/3.11.4/adyen.css">- Create a DOM element on your checkout page, placing it where you want the payment method form to be rendered.
<div id="adyen-card-component"></div>- Create a configuration object with the following parameters:
Parameter name | Required | Description |
|---|---|---|
showPayButton | ✓ | Adyen provides a Pay button. To use the Pay button for each payment method, set this to true. The Pay button triggers the onSubmit event. |
hasHolderName | To show the input field for the cardholder name, set this to true. It is strongly recommended to increase the security of transactions. | |
holderNameRequired | To make the cardholder name a required field (strongly recommended to increase the security of transactions), you need to set the holderNameRequired parameter to true. To show the field, you additionally need to set hasHolderName to true. | |
environment | ✓ | Use "test". When you're ready to accept live payments, change the value to live. |
clientKey | ✓ | Client key is generated by us and it can be used by each domain on 'allowed list'. Contact us to add your origin to allowed ones. Then use value for |
onSubmit | ✓ | Callback function which is called when the shopper selects the Pay button. This applies if you settled showPayButton to true |
onChange | ✓ | Callback function which is called when shopper provides the required payment details |
const configuration = {
      showPayButton: true,
      hasHolderName: true,
      holderNameRequired: true,
      environment: "test", // test || live
  		clientKey: "test_I4OFGUUCEVB5TI222AS3N2Y2LY6PJM3K", //Cleeng client key for testing
      onSubmit: handleOnSubmit,// Your function for handling onSubmit event
      onChange: handleOnSubmit // Your function for handling onChange event
};-
Use the configuration object to create an instance of AdyenCheckout. Then use the
checkout.createmethod to create and mount an instance of the payment method Component.Example for card:
const checkout = new AdyenCheckout(configuration);
const card = checkout.create('card').mount('#adyen-card-component');
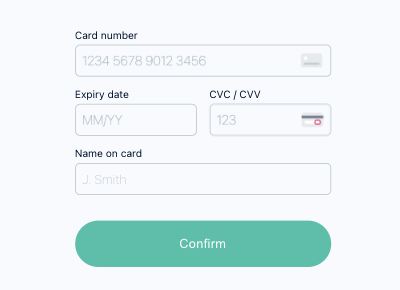
Adyen card component - MediaStore SDK
The card details that you can use for testing are:
Card number: 5555 4444 3333 1111
Card name: any
Card date: 03 / 2030
CVC: 737
For more test card numbers, please refer to Adyen documentation.
- When the shopper enters data in the card input fields, the
onChangecallback is called. If you are using Pay/Confirm button, call the.submit()method from your button implementation. Ifstate.isValidistrue, collect the values passed instate.data.paymentMethod. These are the shopper details that you will need to make the payment.
Pass the encoded card details (state.data.paymentMethod) to MediaStore API.
Here is an example of a receivedstate.dataobject:
{
  browserInfo: {...},
  paymentMethod: {
    type: "scheme",
    encryptedCardNumber: "adyenjs_0_1_18$MT6ppy0FAMVMLH...",
    encryptedExpiryMonth: "adyenjs_0_1_18$MT6ppy0FAMVMLH...",
    encryptedExpiryYear: "adyenjs_0_1_18$MT6ppy0FAMVMLH...",
    encryptedSecurityCode: "adyenjs_0_1_18$MT6ppy0FAMVMLH..."
 },
 riskData: {...}
}
If you need more details about the Adyen component check Adyen documentation. You can see some differences between Adyen and Cleeng documentation because of Cleeng integration with Adyen.
Set up Payment
After the customer filled out the form and you received an encoded card data - send a request to /connectors/adyen/payments with orderId and received card object to make an initial payment.
Remember that order should be already updated with the correctpaymentMethodId(your Adyen payment method Id).Please note that using a wrong payment method Id will cause problems with recurring payments (they won't be processed).
If the purchase was successful, the customer becomes a subscriber of your content, and will be charged for every subsequent period automatically.
Some of the cards may be not supported, you will then receive an appropriate error message.

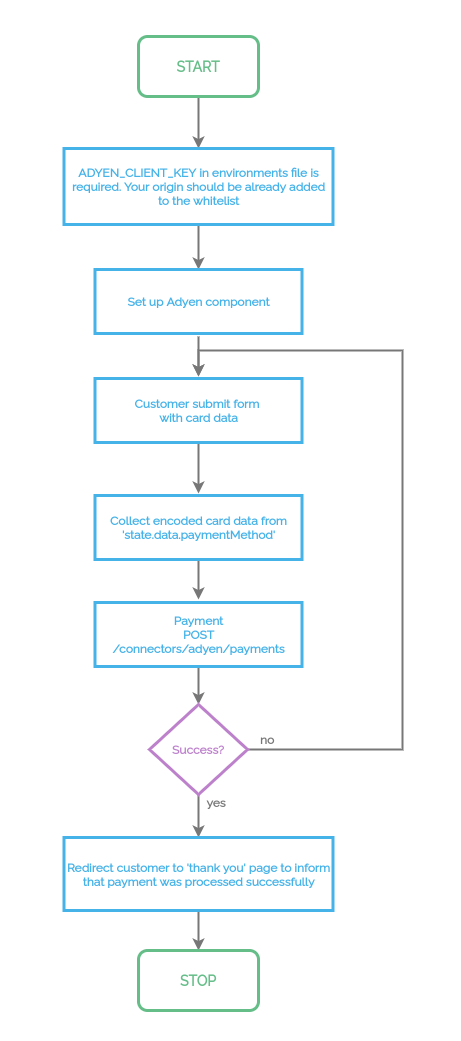
Adyen payment flowchart
Payment Methods
Supported payment methods in Adyen:
- VISA credit card
- Mastercard credit card
- American Express credit card
- Maestro credit card
Up Next
Congratulations! Now, you're ready to accept payments with Adyen.
If you're interested in more options, consider the following:
-
You can continue to PayPal Payment Setup if you want to offer payments with PayPal Express, too.
-
Go to Payment-free Setup if you would like to offer free content.
-
If you're happy with the payment setup but wish to make the user experience for your customers even better, you can go on and implement "My Account" feature, by following My Account-Web use case.
Updated about 2 months ago
