
Apple In-App Purchase - SK2
This tutorial will help you integrate Apple in-app purchases using the StoreKit 2 framework.
This tutorial will help you integrate Apple in-app purchases using the StoreKit 2 framework for devices that support universal purchases, including iPhones, iPads, Apple TV devices and Vision Pro.
👉 Please refer to Apple documentation for information about which Apple platforms and versions are supported for StoreKit 2.
Overview
Payments on mobile and TV apps (in-app purchases) enrich your portfolio with one more payment method for your services. Customers can easily buy access to content directly from inside your native applications, which simplifies the process. It also provides added value to you.
When you enable in-app purchases with Cleeng you gain:
- entitlement across devices for your customers - they can use your services on many devices
- rich and consolidated reporting for you - all-in-one-place reporting that can support your subscriber retention analytics and strategy building.
It is important to note that legally and technically it is Apple who handles the actual payments for purchases made in apps.
For subscriptions (auto-renewable subscription products), Cleeng acts as an observer and tracks in-app purchase lifecycle events to gather data to make it available for analysis and to control access rights (entitlements).
In short, in-app purchases integration requires the setup on your side, and when ready, calling Cleeng purchase registration endpoint to submit the initial purchase when it happens in the app.
Cleeng takes over from there. We validate the purchase in the store, create a subscription and keep it in sync by listening to server-to-server notifications for status updates. And we take care of the reporting.
For passes (non-renewing subscription products), however, Apple does not control entitlements duration - Cleeng does. (For more information, please see Important Implementation Guidance).
This tutorial will show what you need to take care of to enable Apple in-app purchases with Cleeng, as well as what the user-flow will look like.
If you want to jump straight into details, go to the What you have to do section.
What is Apple StoreKit
As mentioned at the start of this tutorial, it will help you integrate Apple in-app purchases using the StoreKit 2 framework. (The legacy integration (now deprecated) based on StoreKit 1 is described here.)
So before we move to integration steps, a few words about StoreKit.
To handle in-App Payments, Apple provides the StoreKit framework. The StoreKit framework connects to the App Store on the app’s behalf to prompt for and securely process payments. The framework then notifies the app, which delivers the purchased products.
StoreKit 2 is an updated framework that developers use to handle in-app purchases, transactions within apps on Apple’s platforms. It provides tools and APIs to create a seamless buying experience for customers while offering developers more flexibility and efficiency when integrating and managing in-app purchases within their applications.
StoreKit 1 and Storekit 2 differ in some aspects, and one of them is purchase validation. As you can see below, purchase validation was based on receipts with StoreKit 1, while now, with StoreKit 2, it is based on Transaction ID.
| Purchase validation is based on: | |
|---|---|
Apple StoreKit 1 |
Encrypted receipts They contain information about what is bought and when, though do not include revenue numbers (actual price paid by the customer). Also the App Store has server-to-server notifications to share information about the subscriber lifecycle and billing information. |
Apple StoreKit 2 |
Transaction ID It is the main object used for validating the purchase, using Server APIs and server-to-server notifications. |
Now, follow the steps below to integrate in-app purchases using the StoreKit 2 framework.
What you have to do
You need to be aware and take care of the following:
- Architecture Overview
- Authorization
- Prerequisites
- Purchase Submission
- Receive Subscriber Status Validation
- Keep Subscribers Synchronized
ImportantIf you want to switch from StoreKit 1 and integrate in-app purchases using StoreKit 2 framework, and you are currently using our StoreKit 1 integration endpoint (deprecated), it is recommended to use our seamless integration.
Otherwise, switching to StoreKit 2 framework will cause your existing StoreKit 1-based implementation to stop working.
1. Architecture Overview
Below you can see the overview of the system architecture. It shows the interaction between your app, Apple AppStore, and Cleeng.
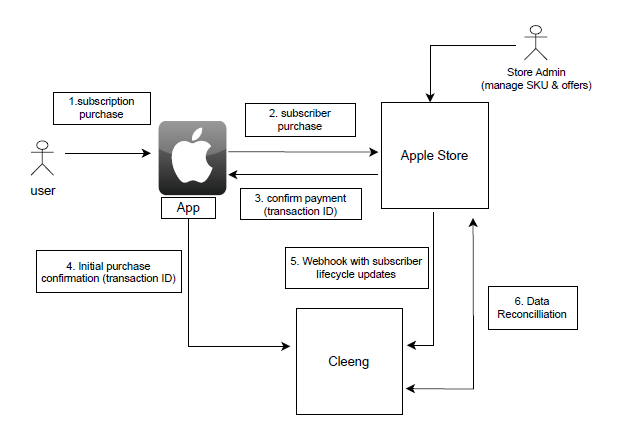
Subscriber Cycle Overview
2. Authorization
Depending on how you integrate with Cleeng, you will use different authorization: either a publisher (X-Publisher-Token) or JWT (Bearer) token. A publisher token will be used for integrations through middleware, while JWT - for direct integrations.
Please note that some integration steps will differ for these two flows.
Also, /storekit2/purchases endpoints that are used in Apple in-app purchase integration accepts either a publisher (X-Publisher-Token) or JWT (Bearer) token for authorization. Please make sure to use the one that matches your current integration.
3. Prerequisites
You need to complete 6 steps in the prerequisites stage:
- Set up a developer account with Apple and create an application
- Add products within Apple Store Connect
- Create Keys in Apple
- Configure Server-to-Server notifications
- Provide configuration in the Cleeng Dashboard
Please follow the sections below for details:
1. Set up a developer account with Apple (see more in Apple documentation) and create an application.
2. Add products
Add products within Apple Store Connect - see Apple documentation.
Products that you add must be compatible with your Cleeng offer.
Important notes for setting up products compatible with Cleeng:
- This Apple in-app purchase integration works for subscription and pass offers. Hence, use the following:
- auto-renewable-subscription products for subscriptions.
- non-renewing subscription products for passes. Consumable and non-consumable products are NOT supported.
- The integration supports multiple Apple App Store subscription groups.
- The product price must be set manually in App Store Connect. Be sure to align prices between Apple's product and your Cleeng offer.
- You can only select price points in App Store Connect.
- To test the setup, log in to your sandbox account on your phone (Settings -> App Store -> Sandbox account), with one of the sandbox accounts created in App Store Connect -> Users and Access -> Sandbox -> Test Accounts.
👉 Remember to add your App store product ID in the offer setup in the Cleeng dashboard in order to map the external offer properly in the Cleeng system. For more information, see this article and the section below specifying where to find product IDs in App Store Connect and link them to Cleeng offers.
👉 Configure subscription upgrades and downgrades in the Cleeng Dashboard (if you use subscription upgrade/downgrade feature). Make sure that upgrade and downgrade offers are set up both in App Store Connect and Cleeng, and that they are properly aligned so that any changes that happen on Apple's side can be properly reflected in Cleeng.
Where to find product IDs in the Apple Store Connect and how to link them to the Cleeng offer?
Go to App Store Connect.
In the Apps section select your app.
In the sidebar, under Monetization, click Subscriptions.
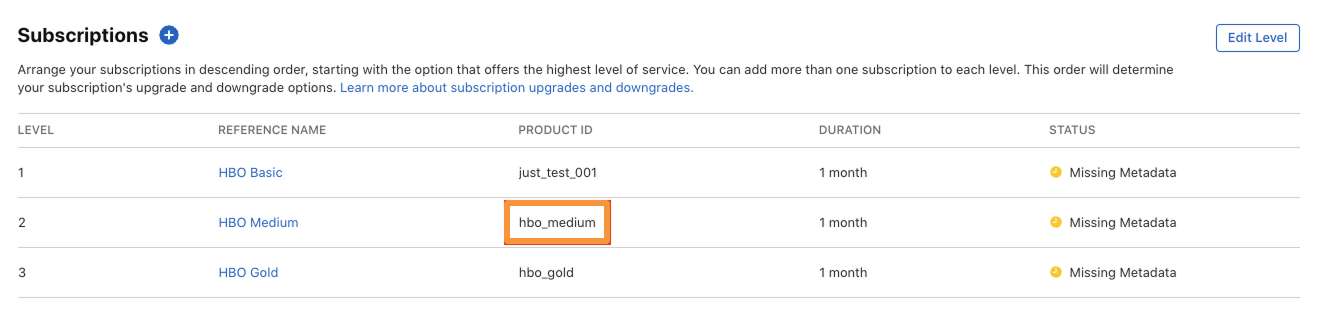
For Auto-Renewable Subscriptions ("Subscription" type of the offer in Cleeng), select the required subscription group, and find the matching product. Copy the product ID:
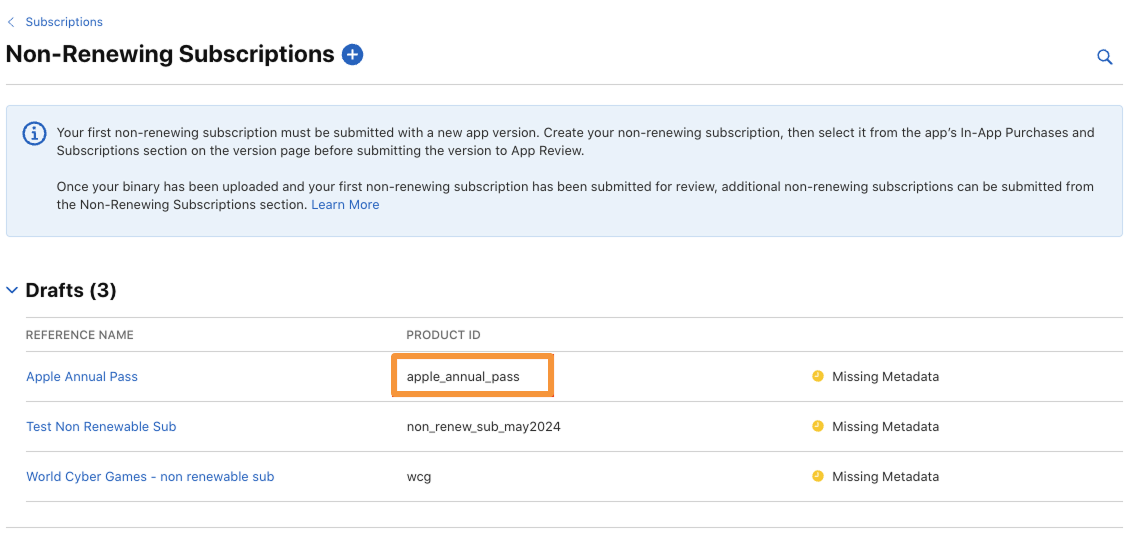
For Non-Renewing Subscriptions ("Pass" type of the offer in Cleeng) click Manage under the appropriate section of the page, and find the matching product. Copy the product ID:
Go to Cleeng Dashboard > Offers & Coupons > Offers. From the list of offers, select the offer you want to link to the external product. Click Edit from the dropdown menu available under the three dots icon on the right. Select the Offer information step, and click Advanced options.
In the App store product IDs section, select the “Apple” store name, and put the product ID you copied from App Store Connect:
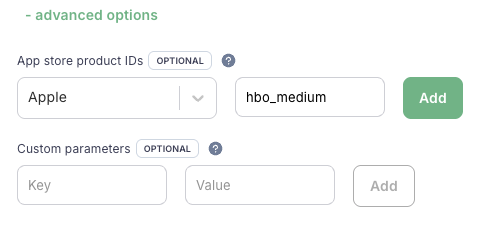
Click Add, and then click Finish editing when ready. Done! Your Cleeng offer is now linked to the Apple product. Whenever the connector receives notifications about subscriptions with this specific Apple product ID, Cleeng will associate those subscriptions with this specific Cleeng offer.
👉 Important: Cleeng system cannot see, manage, or change the products configured in the external store.
3. Create Keys in Apple.
Authorization
Please note that JSON Web Token (JWT) authorization is used for API requests.
Create Private Key
First, you need to create a private key. Any role is sufficient, but we recommend that the access role is set to “Developer” in Apple Connect > User and Access > Integrations. Download your private key after generating it. Please note that it can be downloaded only once. Important: Store your private key in a secure place as it is used to authorize API requests.
Data Access Key
To strengthen reporting we recommend using Data Access Key with the access role set to “Admin” in Apple Connect > User and Access.
4. Configure Server-to-Server notifications
You need to provide a URL address in App Store Connect for server-to-server notifications - see Apple documentation. The URL you need to provide is:
-
https://inapp.api.sandbox.cleeng.com/storekit2/notifications/broadcasters/{publisherId}- for sandbox environment. -
For production environment, it will be
https://inapp.api.prod.cleeng.com/storekit2/notifications/broadcasters/{publisherId}👉 Please remember to replace
{publisherId}with your publisher ID in the URL. For more information on Server-to-Server notifications, see the section below.
NoteWhen using StoreKit 2 make sure you’re using version 2 notifications. For more information, see Apple documentation - App Store Server Notifications V2.
5. Provide configuration information in the Cleeng Dashboard
Once you are ready and have the required information from Apple at hand, log in to Cleeng Dashboard, go to Admin & Tools > Integration Hub > Apple Store.
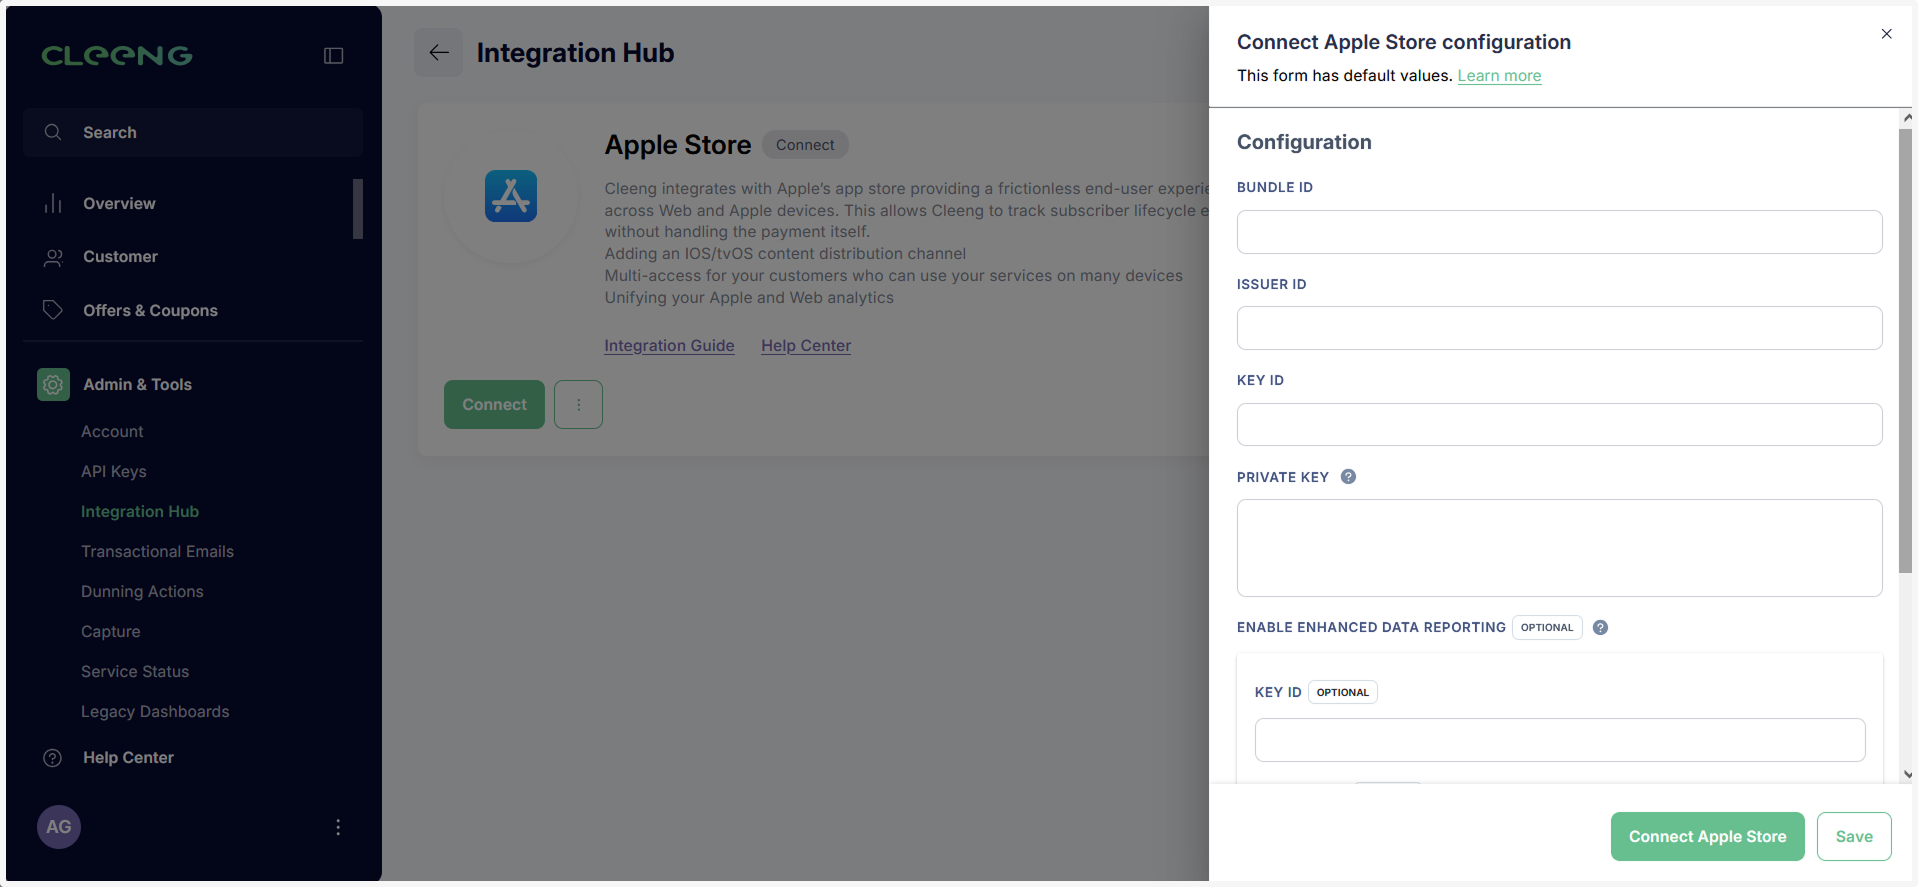
Configuration in Cleeng Dashboard
The section consists of mandatory and optional configuration as specified below.
Mandatory configuration
You need to fill in configuration information in the Cleeng Dashboard so as to automatically synchronize subscribers between Apple and Cleeng. This way your subscribers get access on any device, and you benefit from consolidated reporting.
NotePlease enter your private key in PEM format. PEM format typically starts with '-----BEGIN PRIVATE KEY-----' and ends with '-----END PRIVATE KEY-----'. Ensure there are no additional spaces or characters before or after the key data.
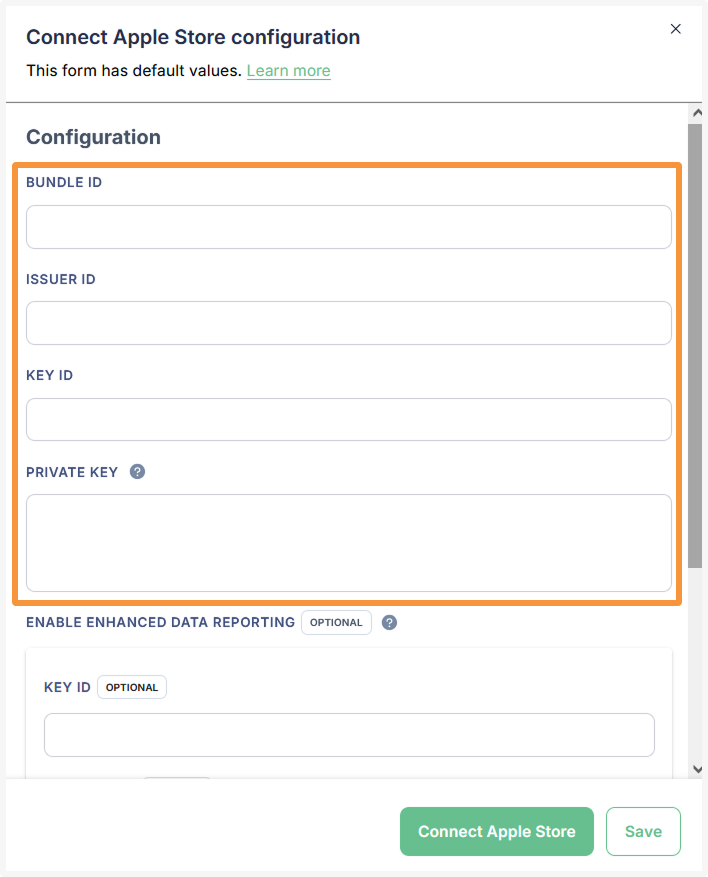
Configuration in Cleeng Dashboard - Required
Configure the required fields: bundle id, issuer id, key id, and private key:
- bundle Id - value taken from the App Store Connect under Apps -> App information -> Bundle ID
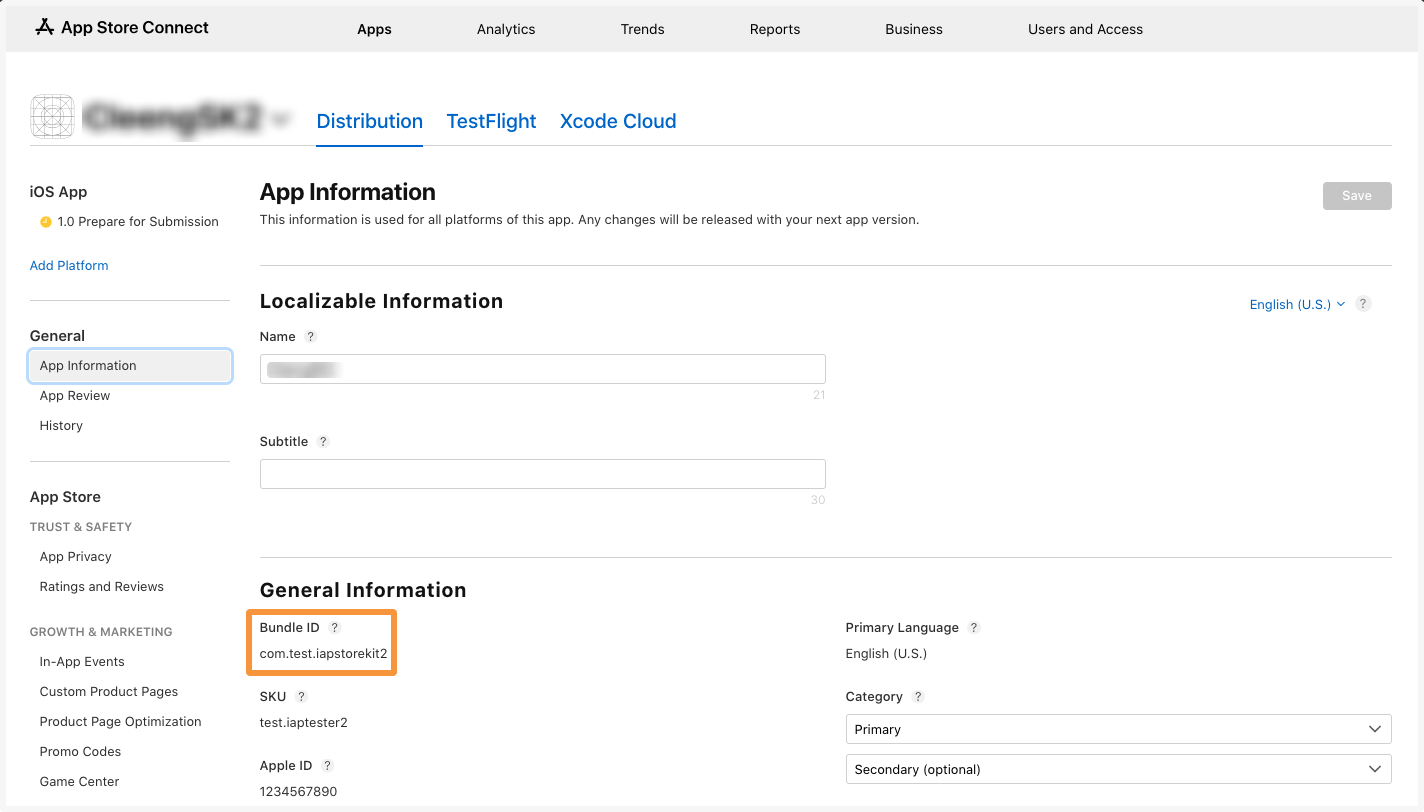
Where to find Bundle ID in App Store Connect
- issuer Id - value taken from the the App Store Connect under Users & Accesses -> Integrations -> Issuer ID
- key id (kid) - value taken from table of generated private keys at the App Store Connect under Users & Accesses -> Integrations -> Key ID
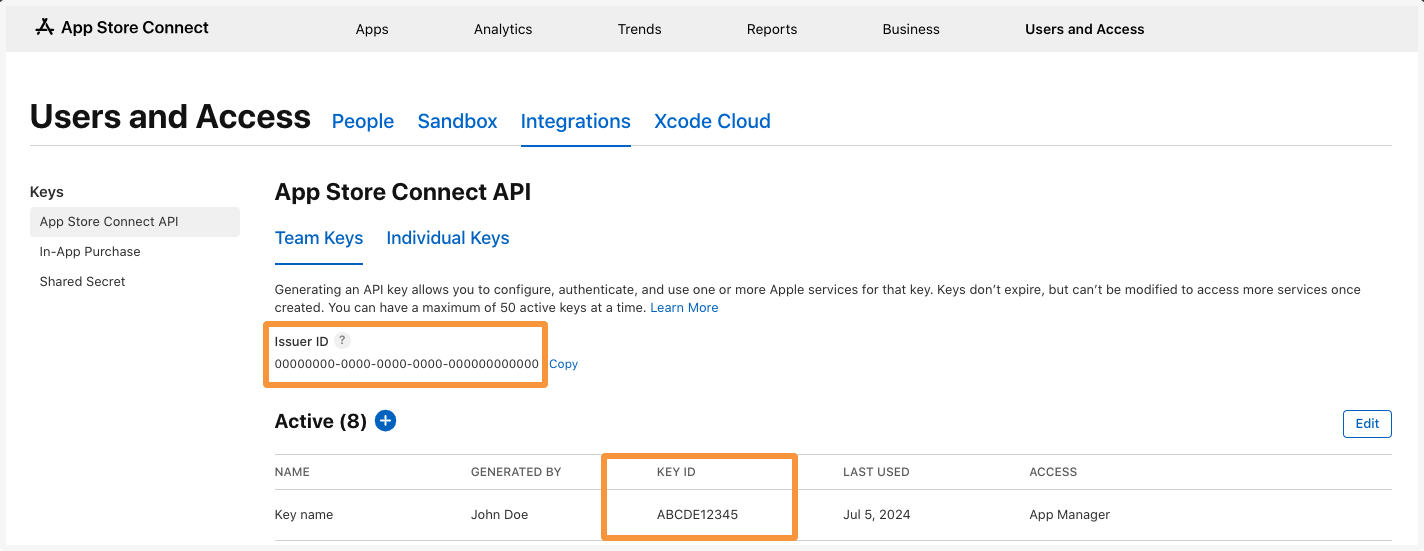
Where to find Issuer ID and Key ID in App Store Connect
- private key - value taken from the file, which can be downloaded only once, right after the private key generation.
Optional configuration
- Data Reporting
Configuring data reporting is optional, but recommended in order to have more insights. To configure data reporting you need to provide the Key ID and Private Key in the respective fields using the Data Access Key (with the access role set to “Admin” in Apple Connect under User and Access).
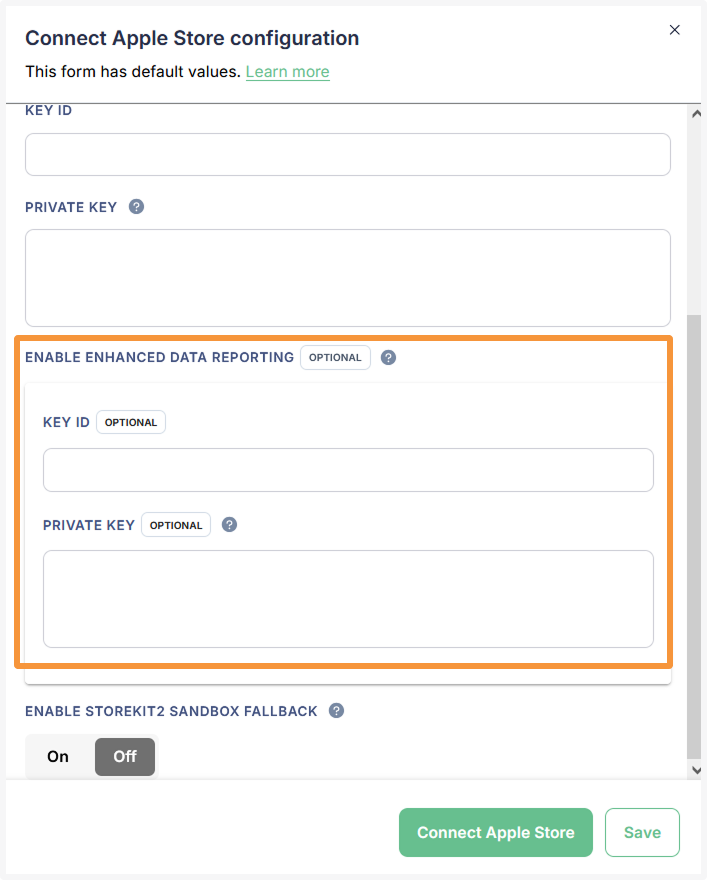
Cleeng Dashboard - Data Reporting Configuration
- StoreKit 2 Sandbox Fallback - Testing Your Setup Before Launching
We strongly recommend configuring StoreKit 2 Sandbox Fallback. It allows you to test purchases before your app is published in the App Store. (For more information, see this section).
To turn it on, set the Enable StoreKit 2 Sandbox Fallback option to On. (The default setting is Off).
ImportantEnable StoreKit 2 Sandbox Fallback only in the Cleeng Production environment when your app is not yet published, and you need to test transactions before going live.
Do not enable this option while testing in Cleeng Sandbox - it can cause entitlement sync issues such as
TRANSACTION_ID_NOT_FOUND.
Understanding Default ValuesDefault values are pre-set options that you can use to successfully integrate with your system. These values are chosen to provide a convenient baseline.
- You can modify default values at any time to fit your specific requirements.
- If you change a default value and want to go back to the original, you can easily revert to the default.
- Default values may be updated by the external system. If you want a value to remain unchanged, manually enter the value instead of relying on the default.

Cleeng Dashboard - StoreKit 2 Sandbox Fallback Configuration
ImportantMake sure that configuration is completed in the Cleeng Dashboard - this is mandatory for the setup to work.
4. Purchase Submission
In-app purchases integration requires calling Cleeng purchase registration endpoint to submit the purchase when it happens in the app.
A request should be sent to the purchase registration endpoint:
POST https://inapp.api.sandbox.cleeng.com/storekit2/purchasesin sandbox ORPOST https://inapp.api.prod.cleeng.com/storekit2/purchases- once in production environment
This endpoint registers a purchase made via Apple StoreKit 2 to initiate a synchronization process.
Due to the time required for Apple's verification, this operation is asynchronous. Upon successful registration, the API will return a 202 Accepted status with a unique synchronizationId in the response body.
The result of the synchronization can be provided later on via webhook, or check purchase synchronization status API.
NoteCleeng tracks each notification sent via Apple and in case of not finding a properly registered purchase in the system that is assigned to a customer account, as a fallback create an Unidentified User which will hold the purchase for future reference.
Your responsibility is to send a proper request to the purchase endpoint to transfer such a purchase to a legitimate user.
5. Receive Subscriber Status Validation
You can check the status of the synchronization process (purchase validation), in two ways:
- via API from your client app or backend server - polling option OR
- via webhook to your backend server.
Polling
Polling can be used both for direct integrations where no middleware is used (the request is submitted directly to Cleeng platform from the client app and authenticated with an end user JWT token), and backend integrations (with middleware).
Use the /purchases/synchronizations/{synchronizationId} endpoint to periodically retrieve the status. The suggested frequency is to poll every 3 seconds for up until 60 seconds.
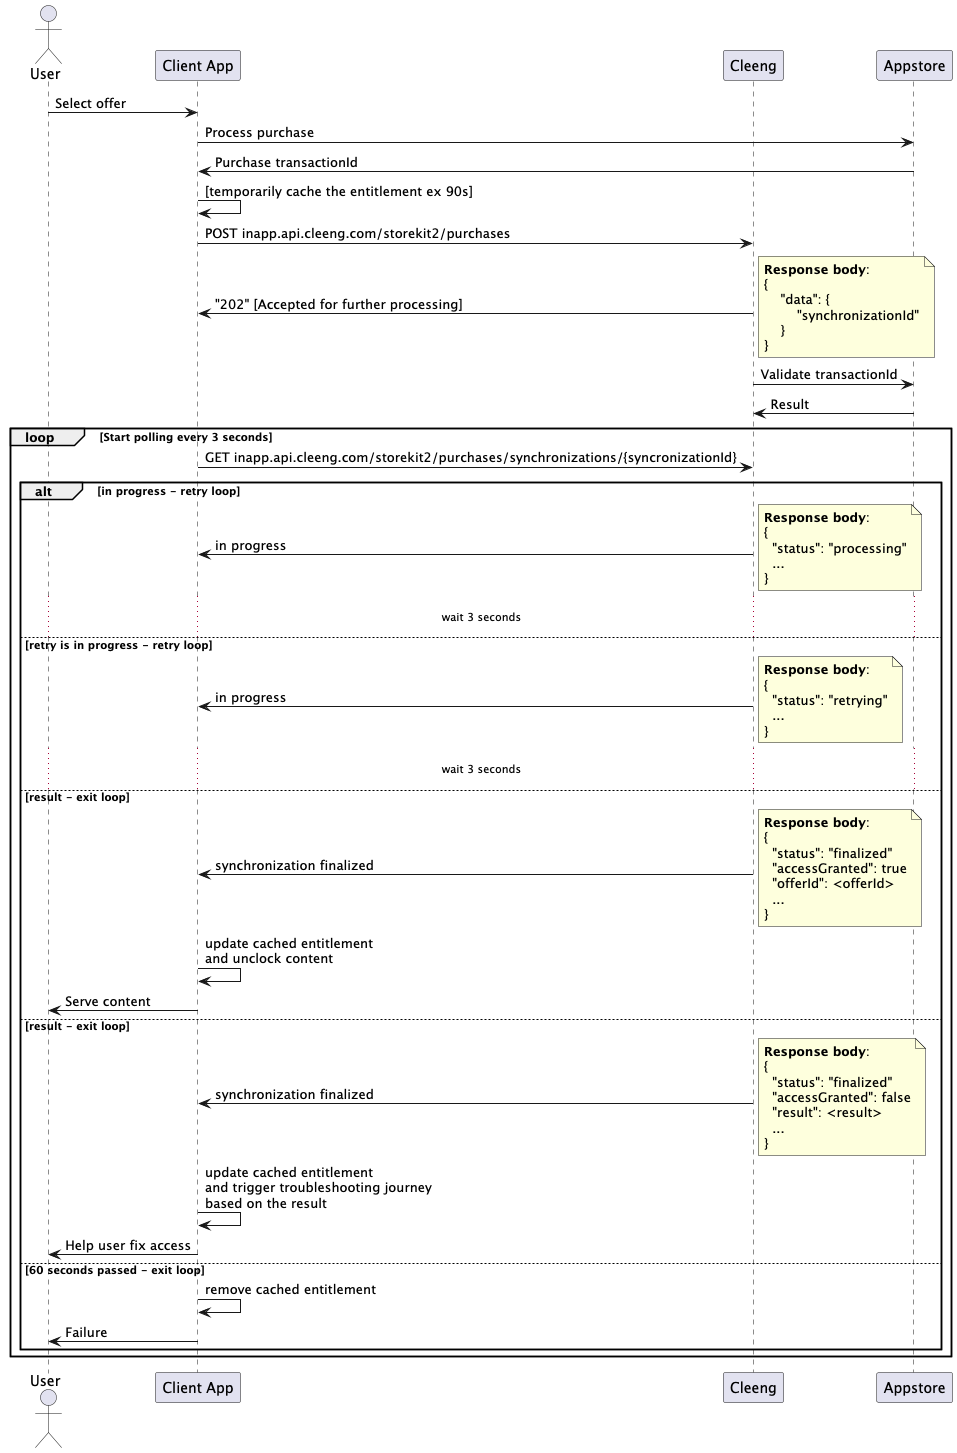
Subscriber status validation - Polling
The endpoint retrieves the status and result of a purchase synchronization process.
While temporarily caching the entitlement is not mandatory, it is strongly recommended to enhance the user experience and ensure immediate access to content. Since purchase validation depends on an external API, there may be some delay before the process is completed and the access is granted permanently.
Here are some possible scenarios and the corresponding response fields:
| status | accessGranted | offerId | result | Description |
|---|---|---|---|---|
| processing | no | The synchronization is still in progress. | ||
| retrying | no | The synchronization encountered an error and is being retried. | ||
| finalized | true | yes | PURCHASE_SYNCHRONIZED | Purchase was successfully synchronized, and access was granted. |
| finalized | false | no | RECEIVED_EXPIRED_PURCHASE | The received purchase was already expired. |
| finalized | false | no | TRANSACTION_ID_NOT_FOUND | The transaction ID was not found. |
| finalized | false | yes | ACCESS_EXPIRED | The user's access to the offer has expired. |
Webhook
For backend integrations your backend service can as well subscribe to Cleeng webhook topics to receive the status of subscriber validation.
Subscribe to the inappPurchaseSyncResult webhook to receive real-time updates on the synchronization status.
The webhook payload includes detailed information about the synchronization, including the synchronizationId, transaction details, accessGranted,offerId, result.
In addition generic subscription lifecycle topics will also be emitted for subscriptions:
General pass lifecycle topics will also be emitted for passes:
For details of possible outcomes of in-app purchase validation and webhooks sent, please refer to In-app Purchase Validation article.
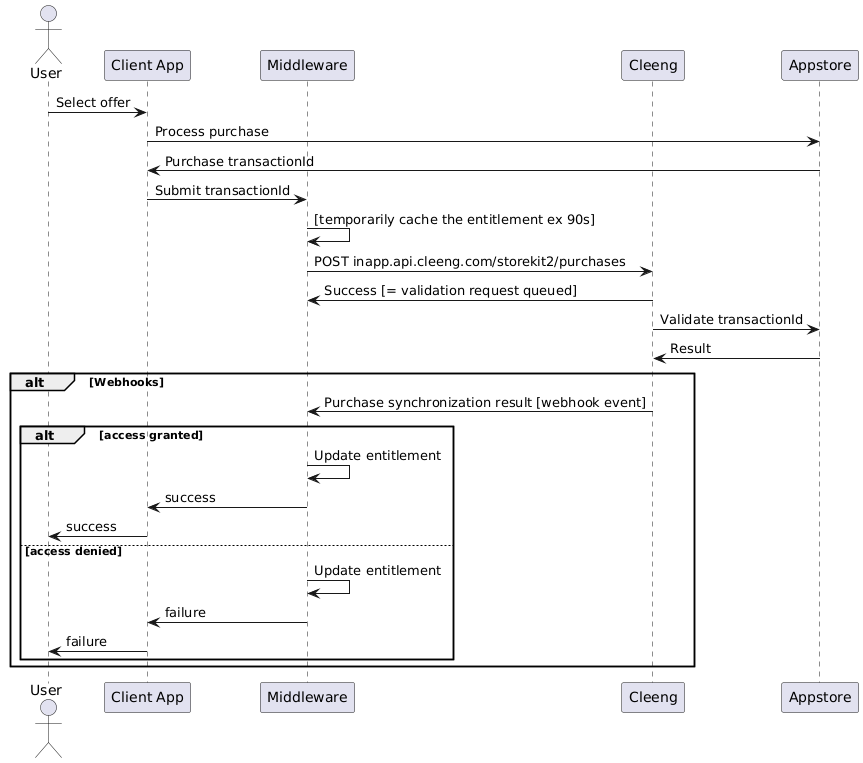
Subscriber status validation - Integration flow with middleware
6. Keep Subscribers Synchronized
Cleeng acts as an observer and tracks in-app purchase lifecycle events. But for Cleeng to be able to do this, you need to configure server-to-server notifications to get status updates and keep subscribers synchronized.
You need to provide a URL address in App Store Connect for server-to-server notifications - as described in the Prerequisites section.
Server-to-Server Notifications
Server-to-Server Notifications is direct one-way communication between Apple App Store and Cleeng. It provides near real-time subscription updates that help to get information about new purchases, renewals, billing issues, etc. This helps to build more accurate analytics, as well as simplifies managing the subscriber’s status.
The table below presents which Apple notifications (version 2) are supported:
| Apple Notification | Supported at Cleeng |
|---|---|
DID_FAIL_TO_RENEW |
✓ |
EXPIRED |
✓ |
GRACE_PERIOD_EXPIRED |
✓ |
SUBSCRIBED |
✓ |
RENEWAL_EXTENSION |
✓ |
DID_CHANGE_RENEWAL_PREF |
✓ |
DID_CHANGE_RENEWAL_STATUS |
✓ |
REFUND |
✓ |
ONE_TIME_CHARGE |
✓ |
User Flow - Subscriptions
For details of the default user and app flow for in-app purchases, please refer to the in-app deafult flows article.
User Flow - Passes
For details of the default user and app flow for in-app purchases, please refer to the in-app deafult flows article.
Please also see the important tips on implementation below.
Important Implementation Guidance on Passes
-
Apple does not control entitlements and life cycle events for passes.
Passes (non-renewing subscription products) purchased via in-app behave differently than subscriptions. Apple App Store does not control entitlements for passes and does not send notifications about entitlements status changes. Entilements and pass lifecycle events are controlled by Cleeng based on offer settings. Non-renewing subscription products will be mapped to pass offers in Cleeng. After a successful purchase validation, a pass is created for the user according to offer settings. The user will be entitled to access the content for the period defined in offer settings.
-
You are responsible for introducing a flow that will prevent multiple purchases of the same pass offer.
Since the store is not responsible for the purchase lifecycle events and the entitlement, it will allow multiple purchases of the same offer. Therefore, you need to verify first if a user should be allowed to make a purchase. Before allowing a purchase, the client app should make sure there is no pending validation and no active entitlement to an offer before allowing the user to purchase. When a user is trying to purchase a pass, the client app should check:
-
If all the previous initial purchase validation requests were processed.
Depending on the status, the client app should display a respective message to the end user. For example “Your purchase is being processed” when a purchase status is pending. Note:
correlationIdis required for checking the status of a purchase, so it should be stored in the client application cache, after each purchase. -
If the user has an active entitlement in Cleeng.
If a user still has an entitlement, the app should inform the user that s/he is already entitled to access the content and purchasing the product again is not possible until the current entitlement expires. Only if these two checks are negative, the user should be able to buy a pass offer.
-
-
What if you do not implement the above flow?
It may happen that users will be able to buy the same offer again while the previous purchase is still being validated. This can result in bad user experience, as it will lead to multiple payments for the same entitlement. If this happens, Cleeng will create a separate entitlement (pass) for each purchase, but the entitlement duration will not be extended - it will overlap instead.
Testing Guidance
When you integrate the above, please follow these steps to test the initial payment configuration:
- Configure in-App purchase in App Store Connect - see Apple Documentation.
- Create a Cleeng sandbox account (or log in if you already have one) and create a test offer.
- Make sure App Store Connect and Cleeng offer in the sandbox environment are compatible - for more information see "Important notes for setting up products compatible with Cleeng" above.
- Provide bundle id, issuer id, key id, and private key in the Cleeng Dashboard.
- Make an initial purchase.
- Subscription/pass is added in Apple settings.
- Subscription/pass is added in Cleeng.
Test Cases
You should cover the test scenarios below to test your integration more thoroughly:
- Initial purchase (of a subscription or pass) - when a logged-in customer purchases an offer from a list of offers available on the purchase page opened on the iOS mobile application.
- Recurring payment - when a customer’s subscription reaches a renewal date and the payment for it is processed (only for auto-renewable subscriptions).
- Subscription switch (upgrade/downgrade) - when a customer switches a subscription to another one (upgrades or downgrades a subscription) (only for auto-renewable subscriptions).
- Subscription renewed - when a customer renews a subscription (that he/she has previously canceled) before the end of its grace period is reached (only for auto-renewable subscriptions).
- Subscription revival - when a customer buys the same offer as the one that he/she subscribed to previously, but the previous subscription was canceled by the customer and got terminated (only for auto-renewable subscriptions).
- Payment failed - when a customer's subscription reaches a renewal date and the payment for it fails (only for auto-renewable subscriptions).
- Subscription transfer/pass transfer - e.g. when a customer has an active subscription bought with one email address, and then he/she logs in with the second email address (using the same Apple Id) and selects the same previously purchased subscription, the new subscription will be transferred to the customer with the second email account.
- Subscription/pass expiration - e.g. when a purchased pass reaches its expiration date, the customer is no longer entitled to the offer-related content.
- Purchase refund - if iOS application supports refunds, the customer proceeds with the refund requesting for the purchase. Once it’s accepted by Apple, the refund is sent to the customer and they are no longer entitled to the offer-related content
👉 You can also refer to offical Apple testing guidelines under this link.
Testing Before App Publishing
If your production application has not been published on the App Store, you cannot test StoreKit 2 integration in Apple’s production environment. But, if you enable StoreKit 2 Sandbox Fallback feature, the requests for which there is no production data available will be directed to Apple's sandbox environment. This will allow you to test transactions safely before you publish your app, and thus reduce post-launch risks.
To enable it, you need to turn on the Enable StoreKit 2 Sandbox Fallback in the Cleeng dashboard (see Prerequisites - Step 5).
ImportantEnable StoreKit 2 Sandbox Fallback only in the Cleeng Production environment when your app is not yet published, and you need to test transactions before going live.
Do not enable this option while testing in Cleeng Sandbox - it can cause entitlement sync issues such as
TRANSACTION_ID_NOT_FOUND.
Note: This feature only works under a single Apple account (both sandbox and production setup is under the same account).
If you enable StoreKit 2 Sandbox Fallback, test transactions using the Storekit2 Sandbox test payment method will be visible in the Cleeng dashboard in the production environment and they will be marked as test transactions/subscriptions.
Good to Know
Unidentified User
Handling "Unidentified Users"
If Cleeng receives an Apple Server-to-Server (S2S) notification for a StoreKit 2 transaction, but your application fails to send the matching /purchases API call, Cleeng creates a temporary placeholder account known as an Unidentified User.
While the payment transaction is safely recorded in our system, content access is not granted to the user until the /purchases call is successfully received to sync the user's details. To ensure a seamless customer experience, it is critical that your client application consistently sends this API call for all transactions.
For more details on how these placeholder accounts work, how to identify them, and how to reconcile them, please read our comprehensive guide on Understanding Unidentified Users in In-App Purchases.
Grace Period - Reducing Involuntary Subscriber Churn
Apple offers the feature of reducing involuntary subscriber churn which is supported by Cleeng. This feature prevents unintentional loss of subscribers due to billing issues. For more detailed information on how it works, please refer to Apple documentation.
Seamless Integration
Seamless integration is only for the clients who are currently using our StoreKit 1 integration endpoint (deprecated).
For devices that cannot be migrated to StoreKit 2, we maintain StoreKit 1 API compatibility (excluding offerId parameter, as it was replaced by app store product IDs mapping in the Cleeng Dashboard).
Clients can also choose direct integration with StoreKit 2 via Apple StoreKit 2 API.
Introduction
For clients who are currently using our StoreKit 1 integration endpoint (deprecated), Cleeng ensures a smooth transition to StoreKit 2 using our seamless integration solution.
This integration simplifies the migration process by using a robust transformation layer that translates StoreKit 1 API calls to StoreKit 2, ensuring all existing functionalities are preserved.
Step-by-step Guide
The process requires actions both on the side of a publisher who is migrated and on Cleeng’s side.
The table below shows the responsibility split and the order of key steps to be performed so as to ensure a smooth and efficient transition for clients integrating with our system.
- Publisher - Actions performed by Publisher
- Cleeng - Actions performed by Cleeng
- Both - Joint coordination required
| Step # | Action | Responsible |
|---|---|---|
| 1 | Offer Mapping & Subscription Setup Verify offer mapping between Apple and Cleeng (see this article). Configure subscription upgrades and downgrades in the Cleeng Dashboard. Cleeng will configure any required upgrade and downgrade logic within the offer structure. | Both |
| 2 | Credential Configuration Set up credentials in the Cleeng Dashboard (see point 5 in the Prerequisites section above). These should be the same credentials that are used for StoreKit 1 integration (important for retrieving information about purchases). Save your configuration but do NOT connect your integration yet - you will do it later in step 6, right before the migration process starts. | Publisher |
| 3 | Migration Planning Contact Cleeng Support Team and agree on the date of migration, selecting a time that minimizes customer impact. Cleeng will confirm and schedule backend adjustments accordingly. | Both |
| 4 | Notification Endpoint Update Update notification endpoint in Apple Application profile (set notification version to v2). See point 4 in the Prerequisites section above. Important timing: This update is done before migration to allow preparation time and prevent data conflicts. During the actual migration (Step 7), notification processing will be temporarily on hold to ensure no SK1 notifications conflict with the new SK2 system. Note: It is recommended that you upgrade your iOS app to StoreKit 2. | Publisher |
| 5 | Backend Preparation Cleeng ensures backend compatibility for seamless API processing. This includes activating the transformation layer that allows existing SK1 API calls to be interpreted as SK2 format. | Cleeng |
| 6 | Payment Method This step should be done on a migration call, right before the migration process starts to avoid a prolonged break in processing Apple notifications. Connect Apple Store in the Cleeng Dashboard. Activating the configuration will trigger creation of the payment method. | Publisher |
| 7 | Migration Execution At the agreed migration date, Cleeng activates the StoreKit 2 processing layer. During this process, notification processing is temporarily put on hold until the migration flag is switched. This prevents any SK1/SK2 conflicts. Once complete, incoming receipts and transactions are handled in SK2 format, while your existing app integration continues to function without change. | Cleeng |
| 8 | Resume Purchase Validation Immediately after migration, Cleeng resumes processing of any paused or queued purchase validations using the StoreKit 2 configuration. All validations will now follow SK2 logic internally. | Cleeng |
| 9 | Sanity Checks Both parties coordinate post-migration testing:
| Both |
| 10 | Reporting Verification After successful validation and migration, Cleeng verifies that transactional and entitlement reporting is functioning correctly under the new SK2 configuration. Any anomalies should be escalated promptly to avoid billing discrepancies. | Cleeng |
✔️ Migration Complete
Your seamless transition from StoreKit 1 to StoreKit 2 is now complete with all existing functionalities preserved.
Testing Guidance
For the publishers who already use StoreKit 1 integration (deprecated), after completing the above Step-by-step guide, there should be no change in customer service delivery when Cleeng starts processing the requests in StoreKit 2 format in the background.
In order to make sure that all the necessary steps are done, you can purchase a new subscription via the existing iOS application and check the purchase in the Cleeng Dashboard for the given customer account. In the Transactions section, the StoreKit 2 payment method should be visible for the latest purchase.
TipPlease refer to StoreKit 2 Sandbox Fallback solution for guidance on testing before app publishing.
Up next
Congratulations! By now you should be all set up to unlock the full potential of this integration in your projects.
As you wrap up, why not explore other integration tutorials for in-app purchases?
Updated 2 months ago