Cleeng-Managed Purchases - Recurring Billing
Check ourReference Materials for more details about a payment connector.
Overview
This tutorial describes how to implement a recurring billing process for subscriptions using the Cleeng Payment API and a payment gateway.
Recurring Billing as part of Cleeng-Managed Purchases is the recurring billing flow where Cleeng manages when an authorisation/ capture/ termination is made.
It can be integrated in two ways:
First, make sure the basic requirements below are in place:
Basic Requirements
To start with this process, ensure that the following are in place:
1. Webhooks - to learn more about how to configure and use Cleeng Webhooks, please click here. You can also find the list of available webhook topics here.
For recurring billing, you will need to subscribe to the following:
- subscriptionReadyForPaymentCapture (mandatory)
- subscriptionReadyForPaymentAuthorisation (recommended)
To find out more about subscribing to webhook events, refer to the Webhook - Subscription Topics section.
Note:
Please note that webhook handler should return "200" http status code meaning that it was successfully processed.
2. Dunning Action Settings - to find out more see here.
Dunning is the process of retrying payment attempts and sending payment reminders to customers when a payment gets rejected.
You can set up dunning actions based on the offer types your service provides. For each offer type and payment method Id configure payment attempts to receive events in provided timeframes. Your endpoint should listen to the subscriptionReadyForPaymentCapture or/and subscriptionReadyForPaymentAuthorisation event. To make sure it will be sent to a proper endpoint, please register in the Cleeng Webhooks Service.
To decide if the recurring billing should be a one-step (only capture) or two-step process (authorisation and capture), you need to configure authorizedFirst parameter in Dunning Actions.
When you've completed the basic requirements, you are ready to select your integration:
- If you choose Split Authorise & Charge Integration, continue to the next step for detailed instructions.
- If the other option is your preferred method, go straight to Basic Direct Charge Integration.
Split Authorize & Charge Integration
Cleeng-Managed Recurring Billing can be integrated as a two-stage process:
For details please see below.
Payment Authorisation Process
Description
Cleeng Webhooks send notifications for the events that happen within the Cleeng system, one of these events is subscriptionReadyForPaymentAuthorisation.
Once subscribed to this event, you will be receiving all the data necessary for performing payment authorisation processes to the specified endpoint that was set up during Webhooks configuration.
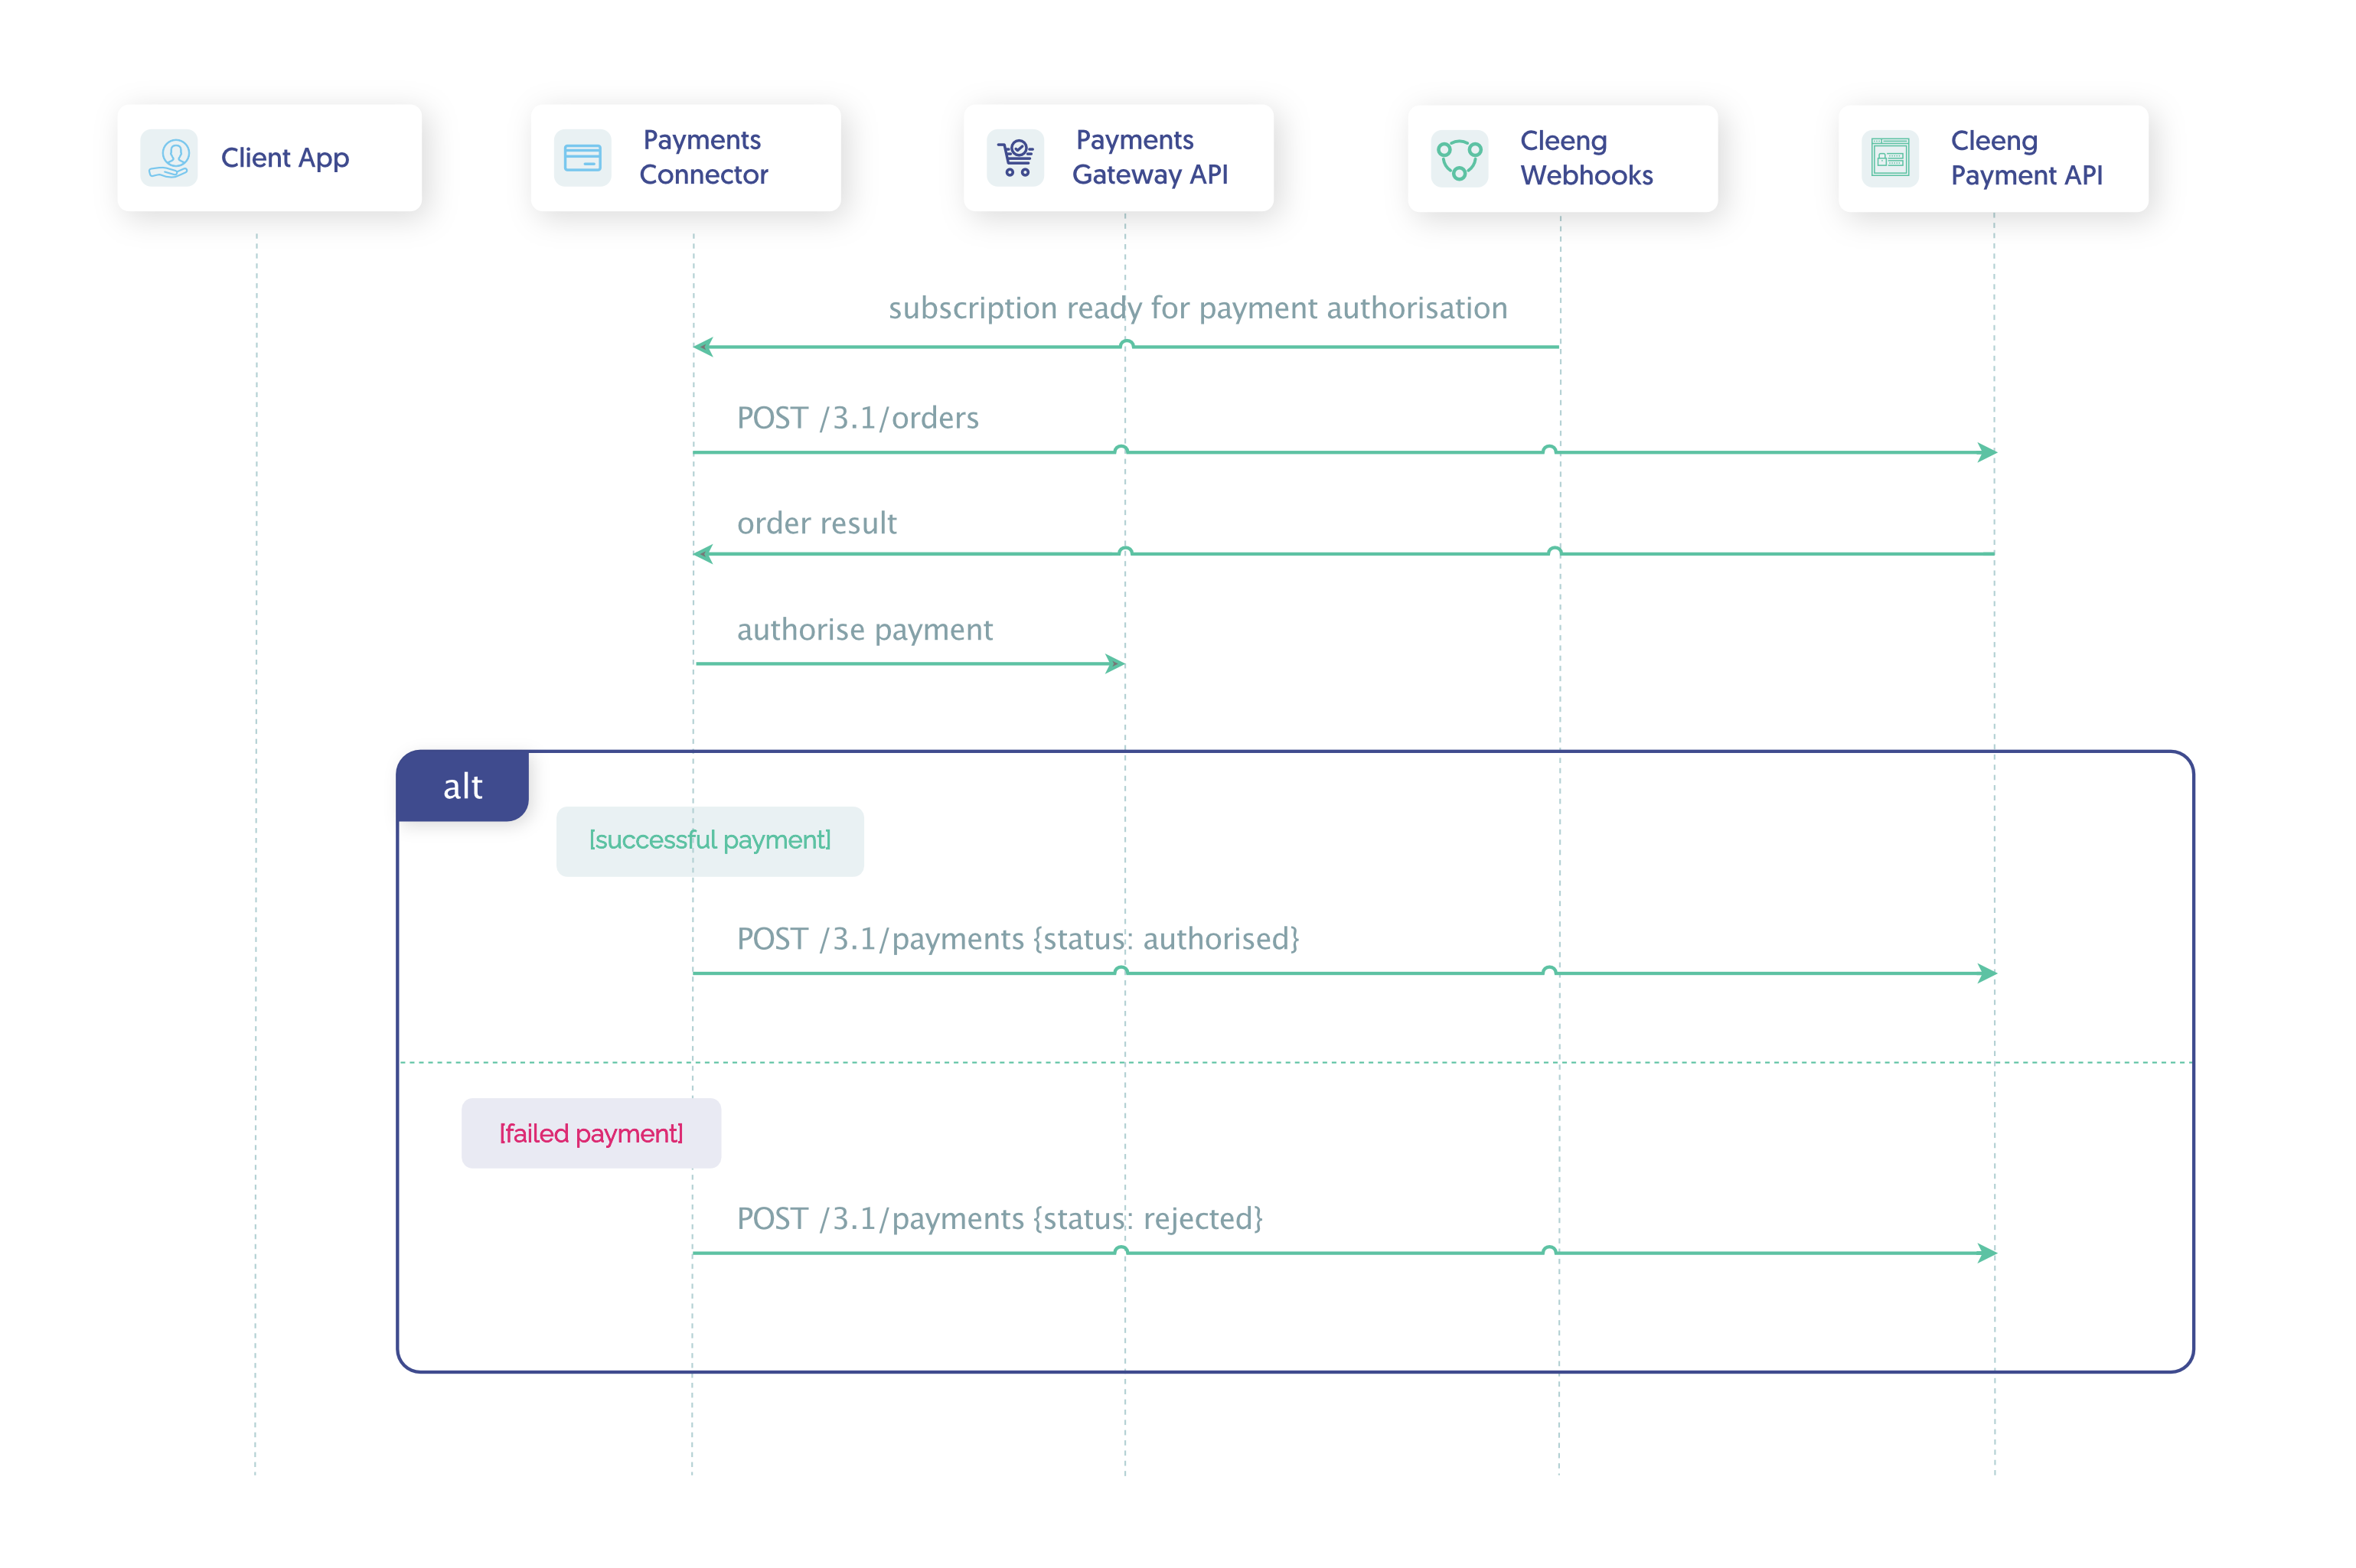
Based on a webhook, an order needs to be created by sending create an order call to Cleeng Payment API. Then the order result returned from this call will be used to trigger payment authorisation with the payment gateway.
In a successful case, to confirm the authorisation, the new payment should be created with 'authorised' status. In a failed case, the new payment should be created with 'rejected' status.
Process Flow

Payment Authorisation Process Flow
NoteDetails of the implementation will depend on a specific payment gateway solution.
Step-by-Step Guide
-
Prerequisites
Before you start, you need to subscribe to the event that you would like to be notified about, in our case this issubscriptionReadyForPaymentAuthorisation(refer here for the guide).Upon subscribing to this event, you will be receiving all the data necessary for performing the authorisation process to the specified endpoint that was set up during Webhooks configuration.
-
Step 1: Create Order
The first step in the process is to create an order which will hold most of the data needed for further actions. For more details on how to create an order, please click here.The order result returned from this call will be used to trigger payment authorisation with the payment gateway.
-
Step 2: Authorise Payment
This step depends on the remote payment gateway system. In general, a request should be made to the remote payment gateway to trigger payment authorisation for the specific subscriber (subscription data is sent in the event). -
Step 3: Authorisation Result
One of two scenarios will apply depending on the result achieved from the previous step:- SUCCESS: CREATE AUTHORISED PAYMENT FOR SUBSCRIPTION
To notify the Cleeng platform that the payment authorisation was successful, the payment authorisation for the subscription needs to be confirmed. To do so, an API call should be made to Cleeng Payment API using payments method.
The Connector should create payment in Cleeng using
POST /3.1 /payments. The new payment should be created with 'authorised' status andpaymentOperationwith ‘recurring-payment’ value.Example of confirm authorisation for subscription cURL request:
curl -X POST \
  https://api.cleeng.com/3.1/payments \
  -H 'Content-Type: application/json' \
  -H 'X-Publisher-Token: a6xxki_mf493WSBjEs9D-UpN-0kyESWYPUQo9S6nEewTyuL7'
  -d '{
     "orderId": 343967543,
     "status": "authorized",
     "pamentDetailsId": 987567897,
     "paymentOperation": "recurring-payment",
     "subscriptionId": 876654543
  }
- FAILURE: CREATE REJECTED PAYMENT
To notify the Cleeng platform that the payment authorisation failed, an API call should be made to Cleeng Payment API using payments method.
The Connector should create payment in Cleeng using POST /3.1 /payments. The new payment should be created with 'rejected' status, paymentOperation with ‘recurring-payment’ value and subscriptionId received from the webhook.
Example of payment rejection for subscription cURL request:
curl -X POST \
  https://api.cleeng.com/3.1/payments \
  -H 'Content-Type: application/json' \
  -H 'X-Publisher-Token: a6xxki_mf493WSBjEs9D-UpN-0kyESWYPUQo9S6nEewTyuL7'
  -d '{
     "orderId": 343967543,
     "status": "rejected",
     "pamentDetailsId": 987567897,
     "paymentOperation": "recurring-payment",
     "subscriptionId": 876654543,
  }
Payment Capture Process
Description
Cleeng Webhooks send notifications for the events that happen within the Cleeng system, one of these events is subscriptionReadyForPaymentCapture.
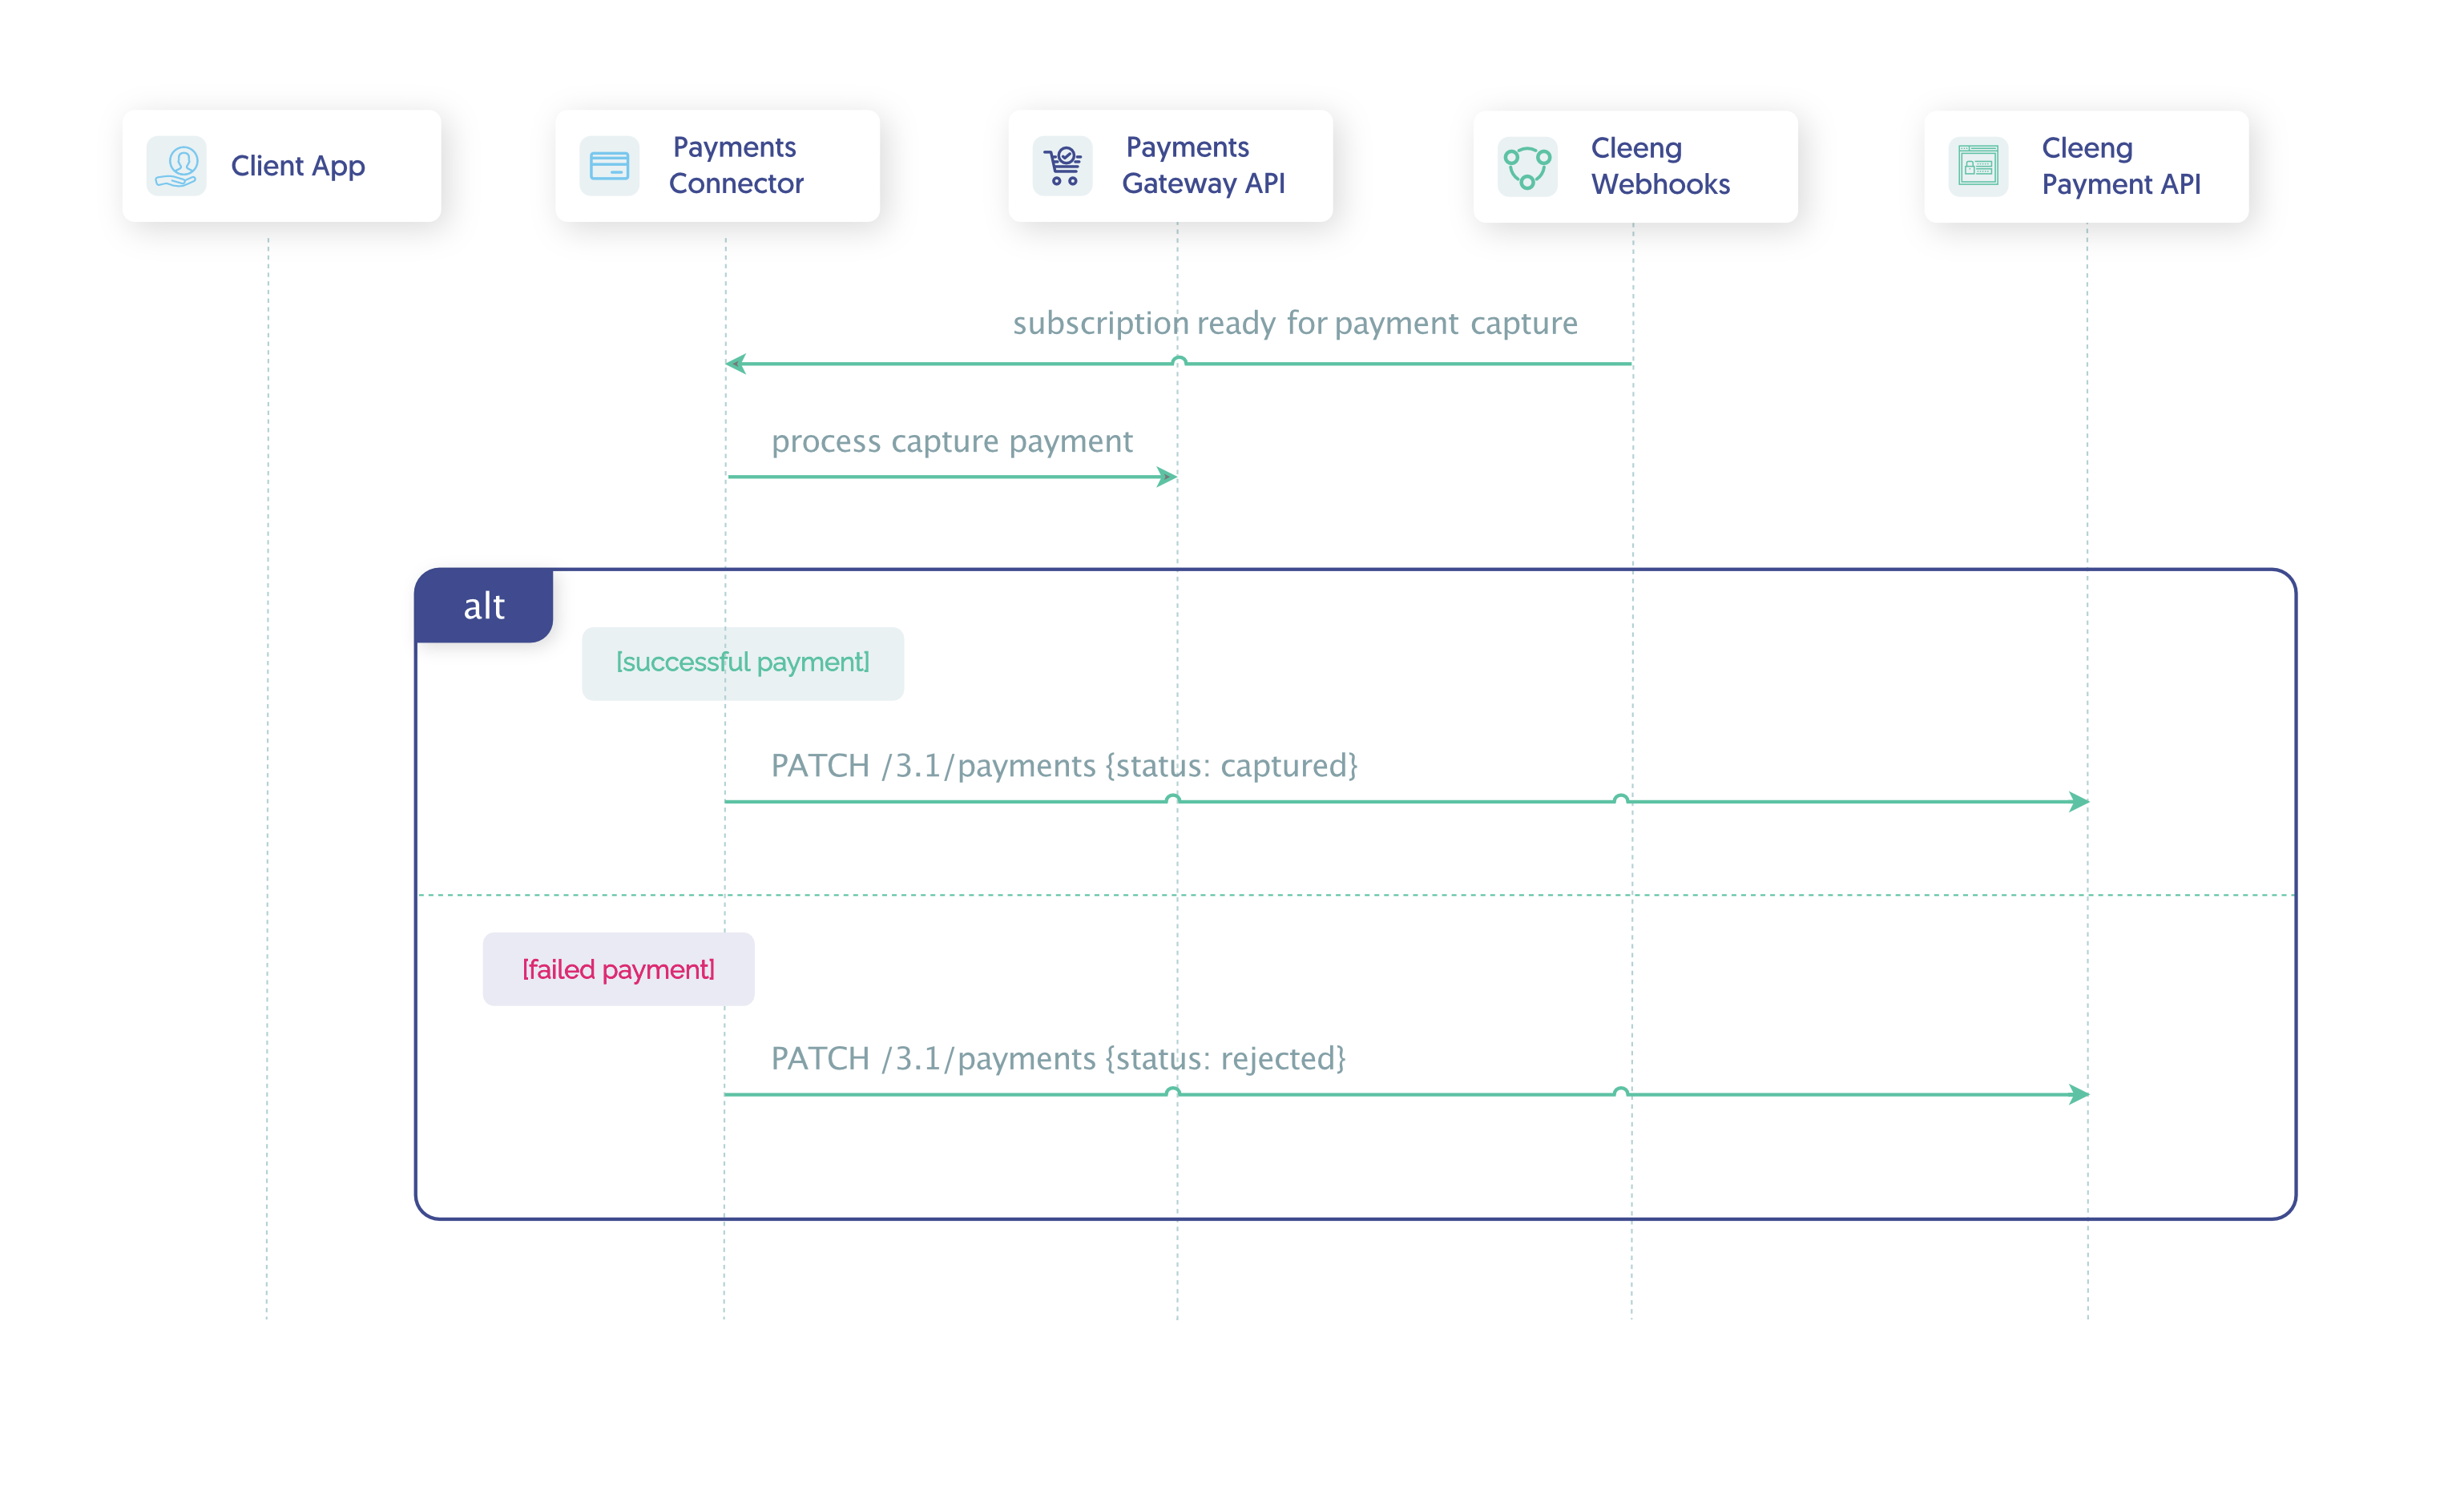
Once subscribed to this event, you will be receiving all the data necessary for performing payment capture processes to the specified endpoint that was set up during Webhooks configuration. The payment capture action needs to be performed with the payment gateway.
Afterward, the result of the payment capture will be either failure or success. In both cases, a call must be made to Cleeng Payment API to either capture or reject the payment with the rejection reason on the Cleeng platform side.
Payment capture can happen after the authorisation process or it can appear alone.
Payment Capture Process after Authorisation
If recurring billing consists of two steps: authorisation and capture, the payment capture process looks as follows:
Process Flow

Payment Capture Process Flow - After Authorisation
NoteDetails of the implementation will depend on a specific payment gateway solution.
Step-by-Step Guide
-
Prerequisites
Before you start, you need to subscribe to the event that you would like to be notified about, in our case this issubscriptionReadyForPaymentCapture(refer here for the guide).Upon subscribing to this event, you will be receiving all the data necessary for performing the capture process to the specified endpoint that was set up during Webhooks configuration.
-
Step 1: Capture Payment
This step depends on the remote payment gateway system. In general, a request should be made to the remote payment gateway to trigger payment capture for the specific subscriber (subscription data is sent in the event). -
Step 2: Capture Payment Result
One of two scenarios will apply depending on the result of the payment capture that was triggered in the previous step.- SUCCESS: UPDATE PAYMENT STATUS TO ‘CAPTURED'
To notify the Cleeng platform that the payment capture was successful. an API call should be made to Cleeng Payment API using payments method.The Connector should update payment in Cleeng using
PATCH /3.1 /paymentswith ‘captured’ status.Example of capture subscription cURL request:
curl -X PATCH \
  https://api.cleeng.com/3.1/payments/345234123 \
  -H 'Content-Type: application/json' \
  -H 'X-Publisher-Token: a6xxki_mf493WSBjEs9D-UpN-0kyESWYPUQo9S6nEewTyuL7'
  -d '{
     "status": "captured",
     "paymentOperation": "recurring-payment",
     "subscriptionId": 876654543,
  }
- FAILURE: UPDATE PAYMENT STATUS TO ‘REJECTED’
To notify the Cleeng platform that the payment failed, an API call should be made to Cleeng Payment API using payments method.
The Connector should update payment in Cleeng using PATCH /3.1 /payments with 'rejected' status.
curl -X PATCH \
  https://api.cleeng.com/3.1/payments/345234123 \
  -H 'Content-Type: application/json' \
  -H 'X-Publisher-Token: a6xxki_mf493WSBjEs9D-UpN-0kyESWYPUQo9S6nEewTyuL7'
  -d '{
     "status": "rejected",
     "paymentOperation": "recurring-payment",
     "subscriptionId": 876654543,
  }
Direct Charge Integration
Cleeng-Managed recurring billing can be integrated as a one-step process: Payment Capture only. This section describes this process.
Payment Capture Only (No Authorisation)
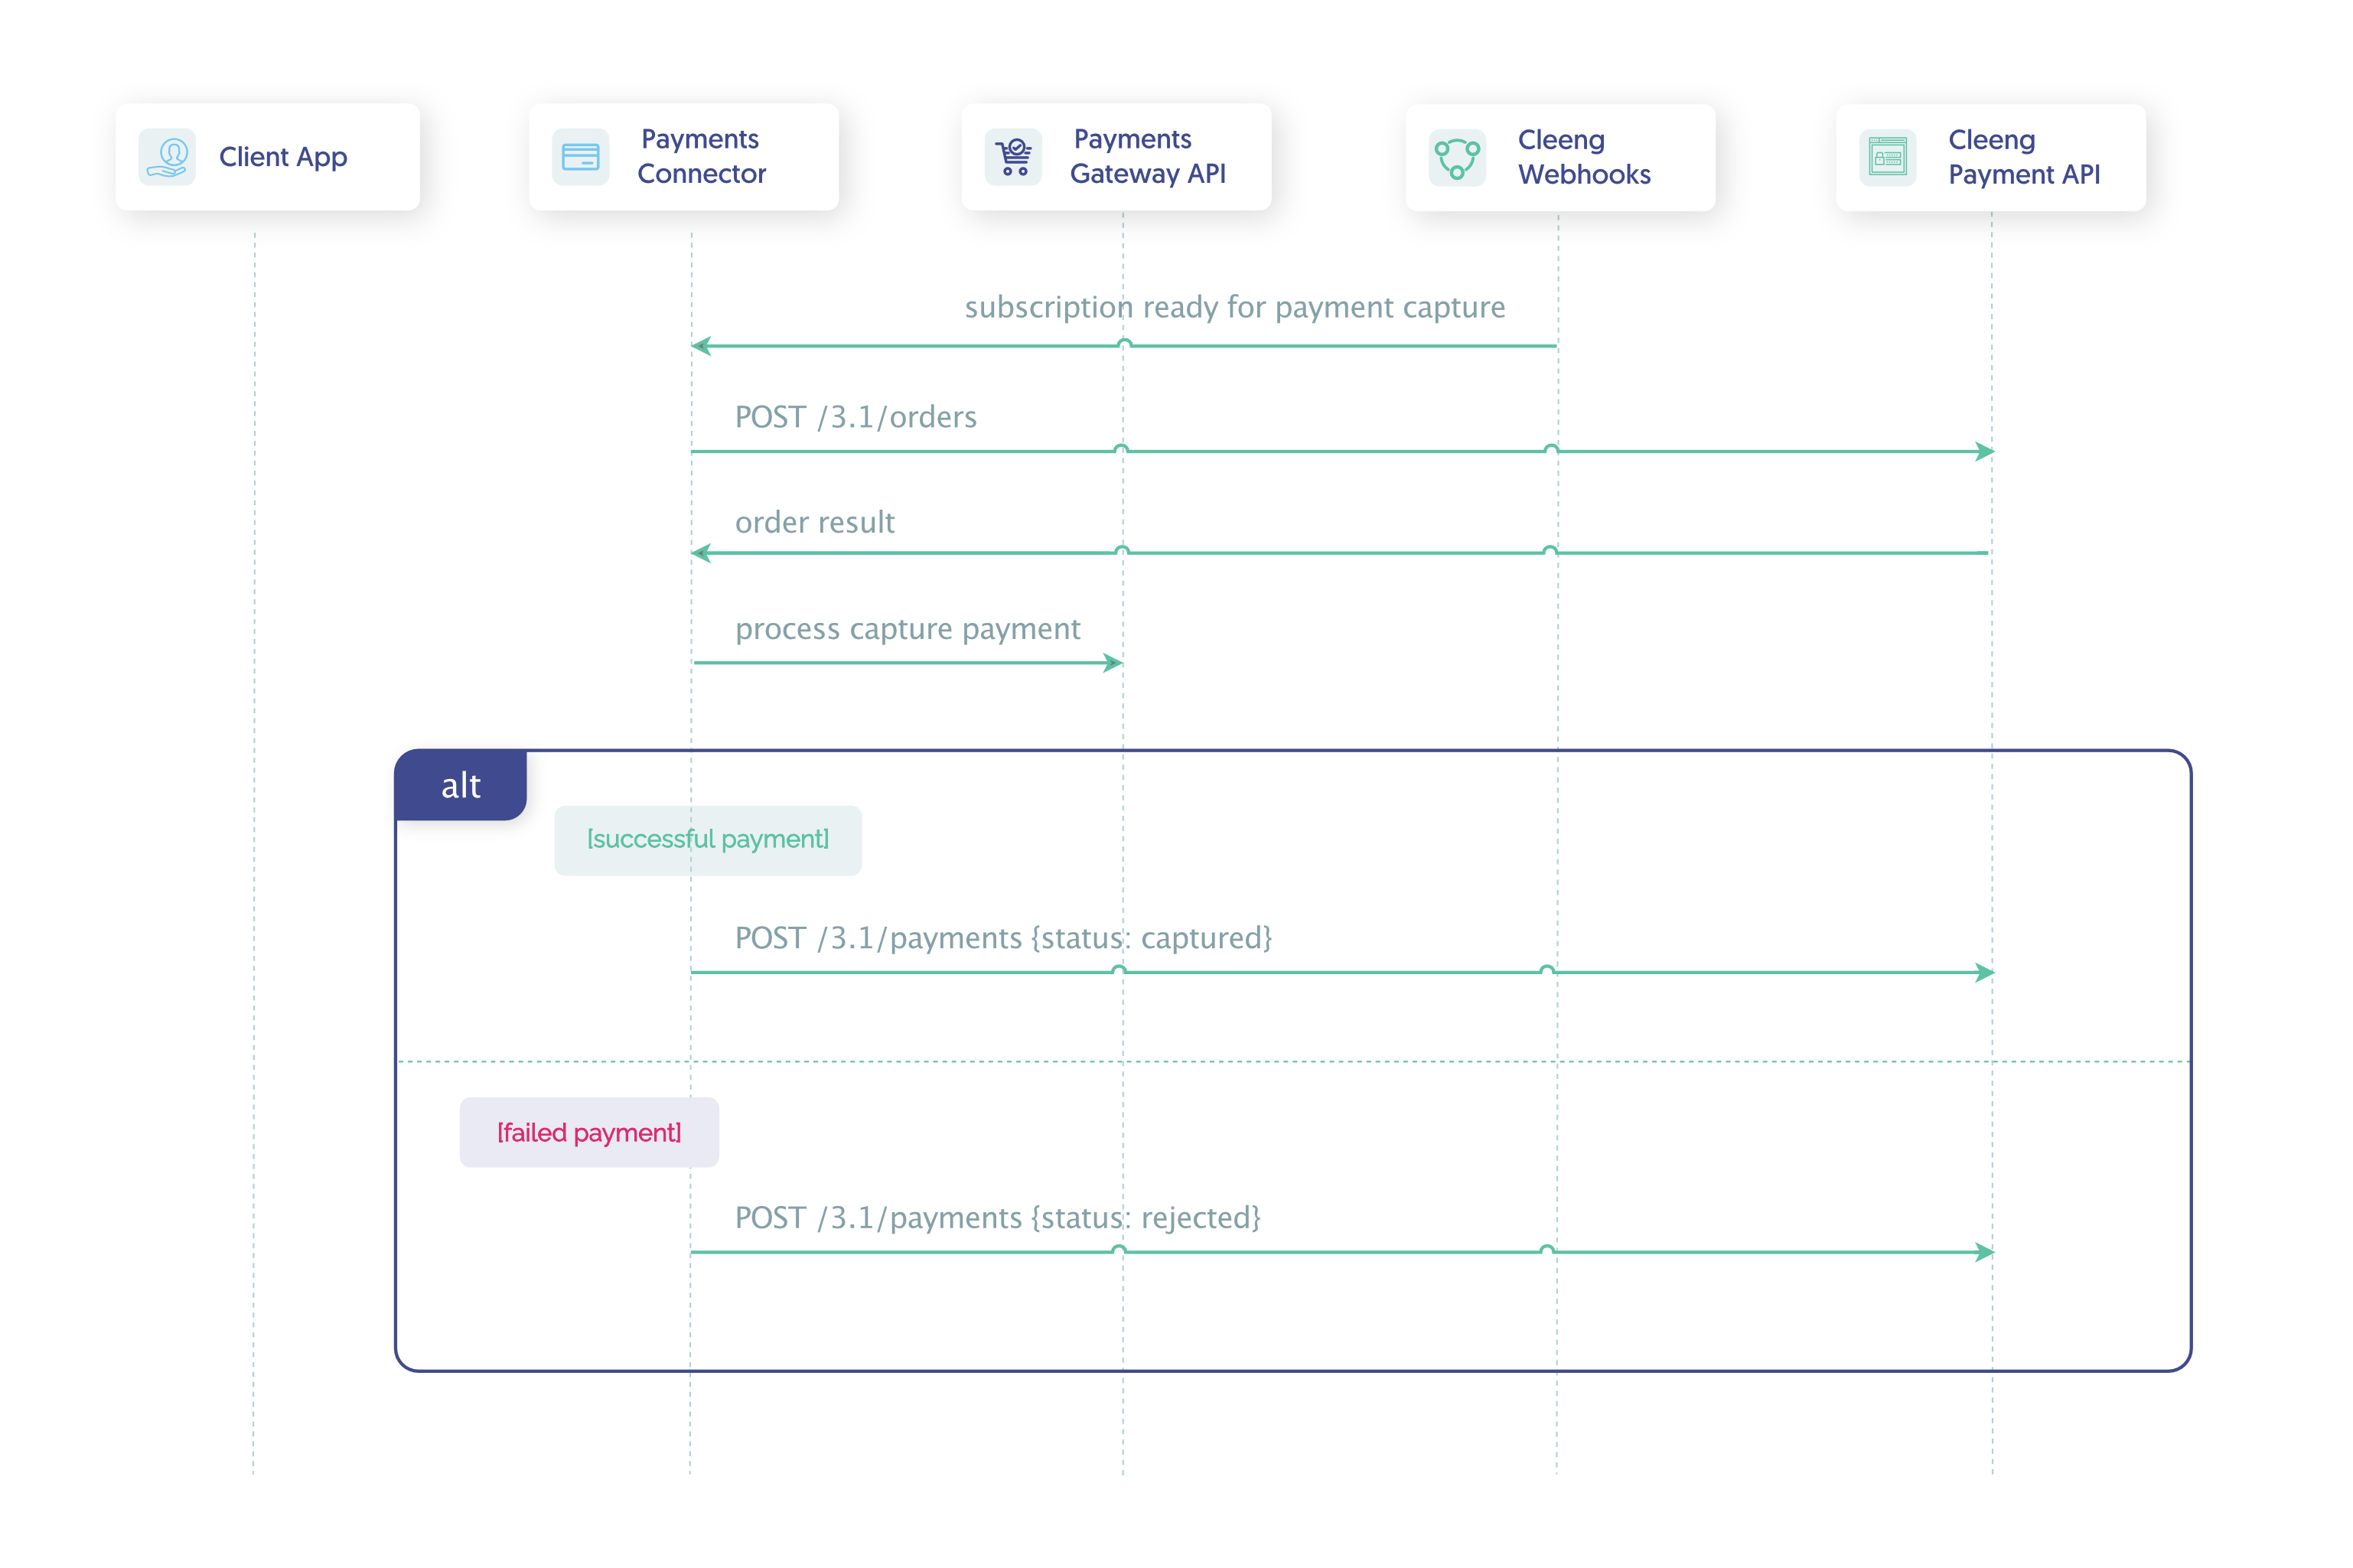
If recurring billing consists of capture only (there is no authorisation step), the payment capture process looks as follows:
1. Process Flow

Payment Capture Process Flow - Without Authorisation
NoteDetails of the implementation will depend on a specific payment gateway solution.
1. Step-by-Step Guide
-
Prerequisites
Before you start, you need to subscribe to the event that you would like to be notified about, in our case this issubscriptionReadyForPaymentCapture(refer here for the guide).Upon subscribing to this event, you will be receiving all the data necessary for performing the capture process to the specified endpoint that was set up during Webhooks configuration.
-
Step 1: Create order
Create order based on webhooksubscriptionReadyForPaymentCaptureusingPOST /3.1 /orders. -
Step 2: Capture Payment
This step depends on the remote payment gateway system. In general, a request should be made to the remote payment gateway to trigger payment capture for the specific subscriber (subscription data is sent in the event). -
Step 3: Capture Payment Result
One of two scenarios will apply depending on the result of the payment capture that was triggered in the previous step.- SUCCESS: CREATE CAPTURED PAYMENT
To notify the Cleeng platform that the payment capture was successful. an API call should be made to Cleeng Payment API using payments method.The Connector should create payment in Cleeng using
POST/3.1 /paymentswith ‘captured’ status.- FAILURE: CREATE REJECTED PAYMENT
To notify the Cleeng platform that the payment failed, an API call should be made to Cleeng Payment API using payments method.The Connector should create payment in Cleeng using
POST/3.1 /paymentswith 'rejected' status.
Up Next
Well done! Now that you are ready with recurring billing you can move on to other features:
- the next recommended feature is Update Payment Details.
- otherwise, go straight to Termination.
Updated 9 months ago
