
Identity Management
Overview
Identity management caters for authentication needs arising in the subscription and subscription retention management business.
Its main functions include:
- Registration - the registration form (with consents approval) for new subscribers (who don't have an account yet)
- Login - the login form for existing subscribers (who already have an account)
- Forgot Password - the ability to reset a password
- Cleeng Custom Fields (legacy name: Cleeng Capture) - an amazing tool that will help you understand your customers through building customer profiles.
Registration
A customer who doesn't have an account yet needs to be registered.
The registration process involves the following steps:
1. Provide Metadata
To register customers you need to specify:
- the customer country (to calculate tax),
- currency,
- locale (which defines language and text formatting).
To get this data, you can request from the frontend to /locales. This data is defined based on the IP address of the request.
2. Fetch Publisher's Consents
There are two types of consents:
- terms & conditions (both Cleeng's and the publisher's ones)
- marketing options (if applicable)
You can manage consents in Admin&Tools -> Custom Fields and fetch them by /publishers/:publisherId/consents.
3. Display Registration Form with Consents
The registration form should include at least email and password fields and checkboxes for terms & conditions and marketing options.
You shouldn't register the customer if she/he hasn't accepted the terms and conditions.
4. Register Customer
If the registration form has been completed correctly, the customer can be registered.
To register the customer use: /customers
After successful registration, the server generates JWT and a refresh token.
JWT is used for authorisation to all endpoints.
Thanks to a refresh token, an expired JWT can be replaced with a new JWT.
For more information on a refresh token please refer to the Refresh token section.
Cleeng saves a customer's registration date in the background. You can review this date in Customer Accounts page or by fetching customer's data. If a customer has not logged in yet, this date will be also used as the 'last login date'.
5. Update Customer's Consents
After successful registration, submit the selected consents by request to /customers/:customerId/consents.

Registration flowchart
5. Testing
Registered customers are shown in the 'Customer Accounts' dashboard.
Go to 'Customer Accounts' page on sandbox or production.
With the registration flow ready, let's move on to the Login section.
Login
Customers can be logged in using offerId or publisherId:
offerId- use login withofferIdif the customer has already chosen an offerpublisherId- usepublisherIdif you want to enable choosing an offer after login.
Call /auths method to log in the customer.
In response, you will get JWT (authorization token), a refresh token and customerToken (you may need customerToken to use other Cleeng APIs).
After logging, you should check consents to make sure that the customer has accepted the latest version. To do so use Fetch customer's consents.
Cleeng saves a customer's last login date in the background. You can review this date in Customer Accounts page or by fetching customer's data. It will be set up after registration and updated after each login.

Login flowchart
Single Sign-onPublishers who use MediaStore SDK-based solution (Checkout, My Account) with an external identity management system as the primary identity provider can use the Single Sign-on (SSO) feature.
Now that you've enabled customers to log in, let's provide for the situation when they forget their password.
Forgot Password
If the customer doesn’t remember the password, he/she can reset it.
Data required for password reset:
- customer email and
offerIdorpublisherId(to identify the customer with the publisher).
This feature can also be used to reset the password in My Account -> User Profile Management.
Default Reset Password Page
If you use a default reset password page, the password reset process is as follows:
- Make a request to
/customers/passwords. - An email with a reset password link will be sent to the given email.
- By following the link, the customer will be able to reset to a new password.
Please note that by default, the link will redirect the customer to the default reset password page. This page will use your branding color as well as logo, which are set in the Cleeng Dashboard.

Default reset password form
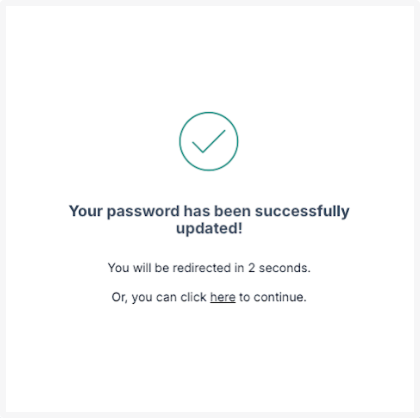
Reset password form - success screen

Reset password flowchart
Custom Reset Password Page
If you use a custom password page, the password reset process is as follows:
- Make a request to
/customers/passwordswithresetUrlparam. - An email with a reset password link will be sent to the given email.
- By following the link, the customer will be redirected to a given
resetUrlwhere he/she should be able to provide a new password (resetPasswordTokenwill be added toresetUrlas a query param). - Update customer password by using
/customers/passwordsendpoint.
Great, you now have the basic features ready: your customers will be able to register to your service, log in and reset their password if they forget it.
Now you can go on and explore an extremely useful feature of Cleeng Custom Fields.
Cleeng Custom Fields
Cleeng Custom Fields (previously known as Cleeng Capture) will help you to understand your users by building customer profiles. Integrate with Cleeng Custom Fields to collect more data about customers and maintain the process easily.

Example form with custom fields
NoteThe custom fields form should be displayed:
- After registration, as an additional step
- After login, if there is any setting that is enabled, required, and hasn't been answered by the customer
- In My Account, to enable answers update
Activate Cleeng Custom Fields
You can simply get the Cleeng Custom Fields to be working in 3 steps:
-
Step 1: Go to dashboard, Click through Admin & Tools, and choose Custom Fields to enable Cleeng Custom Fields (Terms & Conditions and marketing options are available via a separate endpoint).
-
Step 2: Simply select which data you would like to ask for, which should be required, and so on.
-
Step 3: Use endpoints to fetch status and to save customer answers.
Pay attention to the fieldshouldCaptureBeDisplayedas it will help you to decide if you should show the Custom Fields form - it checks if there is any field that is enabled, required, and hasn't been answered by the selected customer. It's worth basing on this field, not to miss any customer who registered before Cleeng Custom Fields have been enabled or before changes to settings have been implemented. Moreover, remember that you can save answers only for the fields that are enabled.
Custom Fields feature is designed to be used after authorization to collect data and in My Account to update them. Custom Fields feature has to be used after registration, as the endpoint requires authorization.
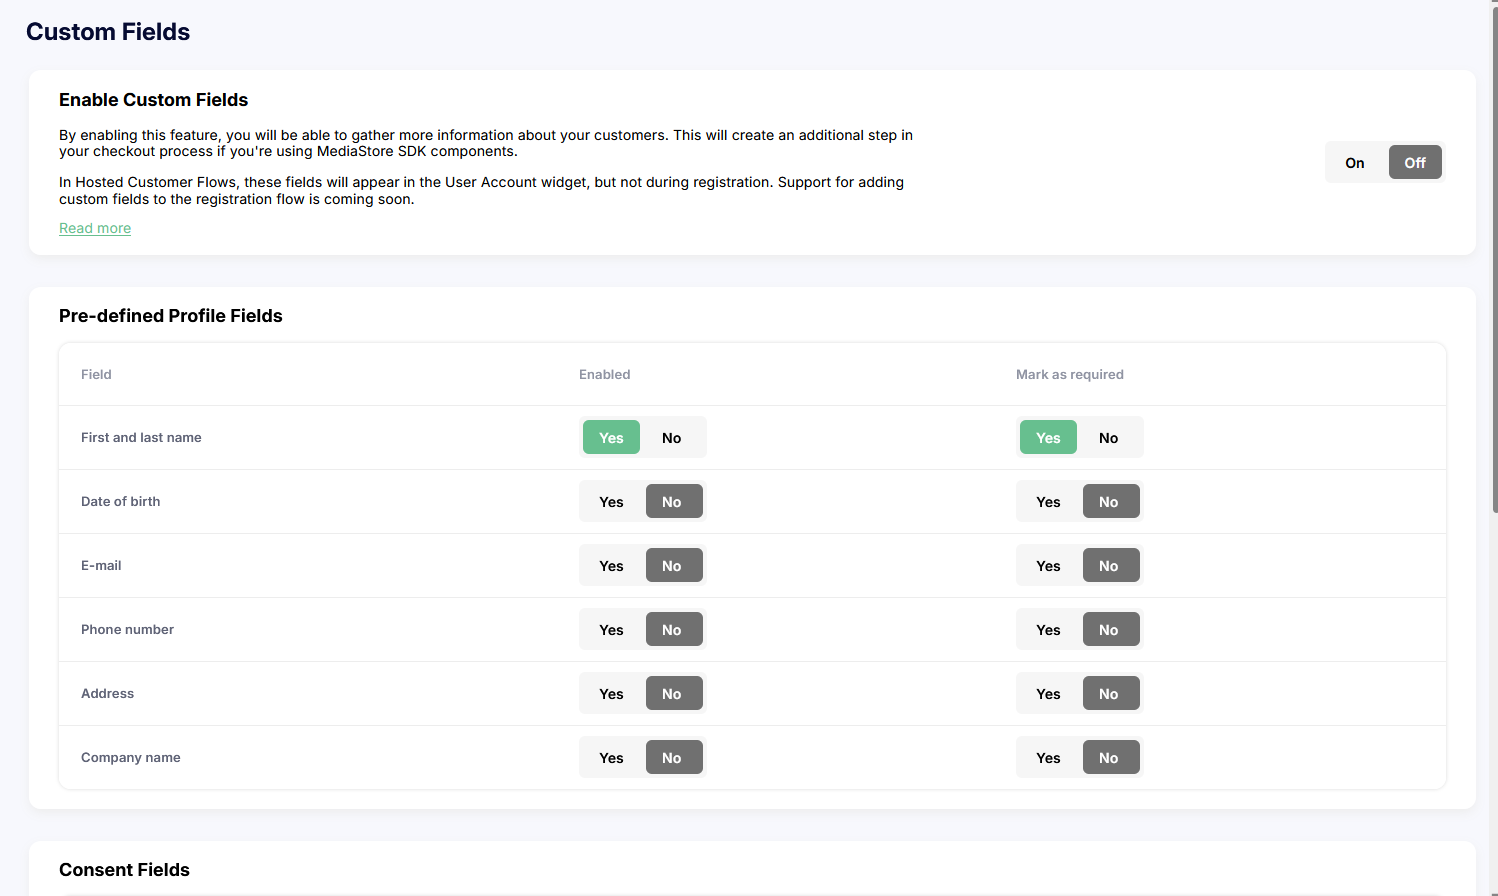
Custom Fields settings in Cleeng Dashboard
Up Next
Now that your customers can easily register and log in to your service, make sure the offers you want to sell are displayed properly. Let's continue with Offer Display.
Updated 4 months ago