
Integrating with Auth0 [Early Access]
Auth0 integration is currently in Early Access. This means it's ready for real-world use while we gather user feedback to enhance the functionality and address any minor issues.
Introduction
Integrating Auth0 with Cleeng allows you to synchronize users between your Auth0 tenant and the Cleeng platform. This is achieved using custom Auth0 Actions, which trigger on user registration or login, and communicate with Cleeng. The integration ensures seamless authentication, user management, and access token issuance, providing a robust SSO (Single Sign-On) experience for your users.
How it works
On every user registration or login, the Auth0 Action sends user details to Cleeng via a secure webhook, ensuring the user is created or synchronized and receives an access token.
Benefits
- Seamless User Synchronization: Automatically syncs users between Auth0 and Cleeng, reducing manual management.
Main Concepts
- Secret - Cleeng credentials, generated in the Cleeng dashboard > Integration Hub > Auth0 Actions and used in the setup of Auth0 action
- Access token - end-user’s access token, returned from the Auth0 - Generate token API call.
Step-by-Step Implementation Guide
Prerequisites
Before you start, you need to have:
- An active Auth0 account with admin privileges.
- An active Cleeng account (make sure you have a Cleeng sandbox account for testing).
Step 1: Obtain Configuration Details from Cleeng Dashboard
-
Go to Cleeng Dashboard > Integration Hub in the main menu.
-
Select Auth0 Actions from the connectors list under Identity Management.
-
Click the Connect button to display the Auth0 Actions configuration screen.
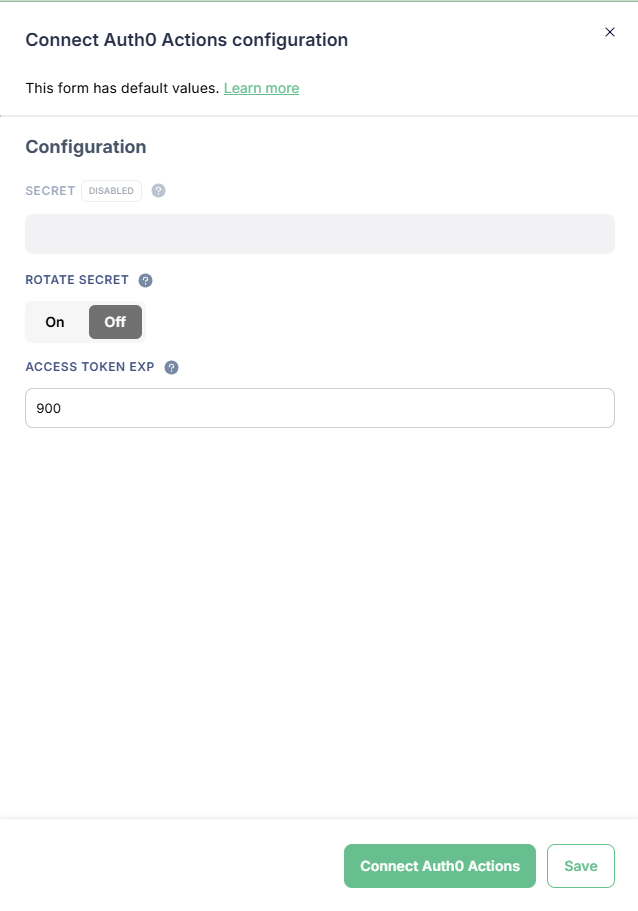
Cleeng Dashboard: Auth0 Actions Configuration Screen
-
Click Save to auto generate the secret. OR click Connect Auth Actions to generate the secret and connect the integration immediately.
Note: Secret contains your Cleeng credentials and it is auto-generated after saving configuration. You will need it later in Step 2 for the Auth0 Action setup.
ImportantIf you need to change your secret, use the Rotate secret option in the configuration screen.
When you toggle the button to ON, a secret will be auto-generated when you save your configuration. The change will be applied immediately, so make sure you update the secret in your Auth0 Action settings for the integration to work properly.
-
(Optional) You can adjust user access token expiration time - this is default expiration time for the issued JWT access tokens.
Step 2: Install and Deploy the Cleeng Auth0 Actions
In this step, you will create actions in your Auth0 tenant.
You will need to create actions for the following triggers:
- post-user-registration (see more in Auth0 documentation)
- post-login (see more in Auth0 documentation)
These actions contain the logic that will securely communicate with Cleeng. You will add your Cleeng secret to them and attach them to your Auth0 Registration Flow and Auth0 Login Flow.
2.1 Write and Deploy the Action
First, you need to create a new Action for each: registration and login.
For detailed instructions, follow Auth0's official guide on Writing Your First Action.
A) Add the Cleeng Secret to the Action
Your Action needs the Cleeng secret generated in Step 1 to authenticate securely. You will add this as a secret within the Auth0 Action editor.
Create the secret with the following:
- Key: CLEENG_CLIENT_SECRET
- Value: Paste the Secret value from the Cleeng dashboard.
B) Add code that will execute the Auth0 - Generate token API call
You need to add code that will execute a call to Cleeng API endpoint: Auth0 - Generate token.
- Sandbox environment: POST https://identity.api.sandbox.cleeng.com/hooks/v1/auth0/actions/token
- Production environment: POST https://identity.api.prod.cleeng.com/hooks/v1/auth0/actions/token
This endpoint requires a Bearer token (JWT) for authorization. You need to use the JWT (secret) obtained from Cleeng Dashboard > Auth0 Actions configuration as bearer token during request.
See the example code for post-login trigger:
const axios = require("axios");

exports.onExecutePostLogin = async (event, api) => {
  const cleengJwt = event.secrets.CLEENG_CLIENT_SECRET;

  const user = event.user || {};
  const userMetadata = user.user_metadata || {};
  const appMetadata = user.app_metadata || {};

  const auth0Id = user.user_id;
  const email = user.email;

  // Adjust how you derive first/last name depending on your profile data.
  const firstName =
    user.given_name ||
    userMetadata.firstName ||
    appMetadata.firstName ||
    "";
  const lastName =
    user.family_name ||
    userMetadata.lastName ||
    appMetadata.lastName ||
    "";

  const userIpAddress =
    (event.request && event.request.ip) ||
    (event.client && event.client.ip) ||
    "";

  const payload = {
    auth0Id,
    email,
    firstName,
    lastName,
    locale: "en_US",
    country: "US",
    currency: "USD",
    userIpAddress,
  };

  try {
    const res = await axios.post(
      "https://identity.api.prod.cleeng.com/hooks/v1/auth0/actions/token",
      payload,
      {
        headers: {
          Authorization: `Bearer ${cleengJwt}`,
          "Content-Type": "application/json",
        },
      }
    );

    const accessToken = res.data.accessToken;
    api.idToken.setCustomClaim(
      "cleeng_access_token",
      accessToken
    );
  } catch (e) {
    console.error('Error from Cleeng: ', e.message, e.response);
    throw e;
  }
};
2.2 Add the Actions to your Flows
Finally, you must add the Actions to your Auth0 Flows: Registration and Login to ensure it executes whenever a user registers or logs in.
For detailed instructions, please refer to Auth0's official guide on how to add actions to flows.
Once your Action is successfully deployed and added to the flow, you are ready to begin testing.
Testing
- Log in to your app as a test user via Auth0.
- After a successful login:
- The test user should be visible in Cleeng’s user database (Cleeng Dashboard > Customer > Customer Accounts).
- You should receive a Cleeng access token inside your Auth0 token.
Important Information for Clients Using Hosted Customer Flows
This information is important if you use Cleeng hosted customer flows (hosted widgets).
If you use an external Single Sign-On (SSO) provider, such as Auth0, you must prevent users from editing their profiles or passwords within the Cleeng Account hosted widget. This ensures your identity provider remains the single source of truth and avoids data conflicts.
To do this, set Identity Provider to External while configuring the Sign Up in the Cleeng Dashboard > Admin & Tools > Hosted Customer Flows (see the dashboard configuration of hosted customer flows for more details).
This will prevent the "Update profile" section from showing.
Updated 4 months ago